

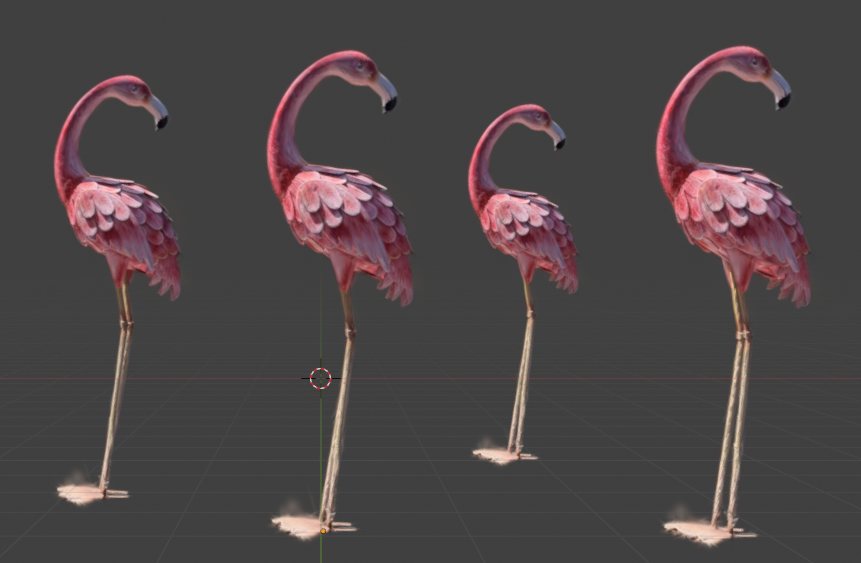
3DGS Render by KIRI Engine v5.0.0
The addon is a full Gaussian Splat editing and rendering suite for Blender.
3DGS scans can be created from .OBJ files or, by using two distinct modes – Edit and Render - 3DGS .PLY files can be imported, edited and rendered. Extensive editing tools and modifiers are included – with the results being exportable to other 3DGS software and viewers.

Download 3DGS Render Addon


Please note: We are making these Blender addons available to you completely for free.:) If you like what we are doing, the best way to support us is to download KIRI Engine app on your phone and consider becoming a KIRI Engine Pro user
1. 5.0 Update log
Major Features
- Rigging / Proxy animation baking (Experimental)
- Light Baking (Experimental)
- 4DGS / .PLY sequence exports
- Applying 3DGS transforms now applies SH attributes as well as rotation and scale
Quality of Life Features
- Render mode - exposed SH degree and camera threshold settings for users with lower spec systems.
- Optimised the Geometry Node tree.
- Camera frustrum and distance culling options for the Active Object in Edit mode.
- Render mode - users compositor setup is maintained and restored after rendering.
- Render mode - added a delete temp files button to clear helper images after rendering is complete.
- Added a Remove SH button to clear all higher Spherical Harmonic attributes from a mesh.
- Added an Apply Rest Pose button for Armature objects.
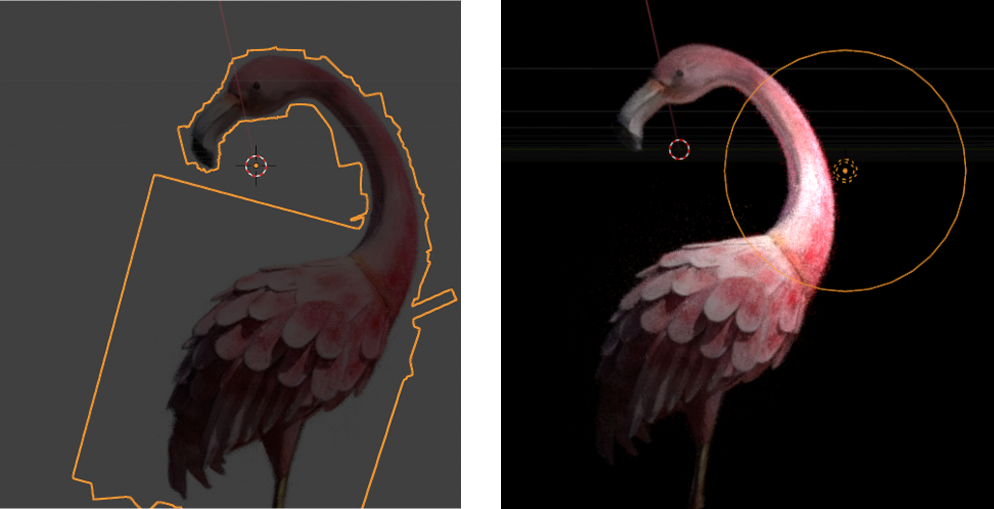
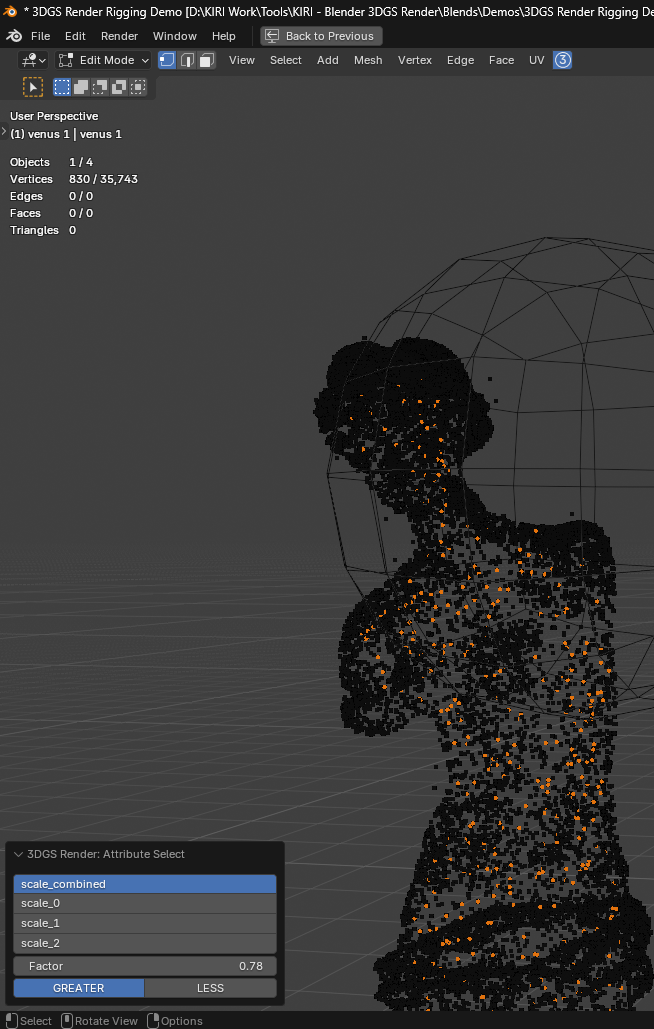
- Edit mode selection tools in Edit mode, for selecting splats by size atttributes or bounding objects.
- Added a UV Edit modifier for using image textures and stylised work in Edit mode.
- Added a button for converting between vert and face based 3DGS meshes in Edit mode.
Major Bug Fixes
- Updated the add-on for the new Blender Python 13
- Switching between HQ / LQ materials in Edit mode was broken since Blender 5.0.
- Switching between Edit and Render modes would sometimes stop or prevent Render mode updates.
- Compositing with native Blender meshes had incorrect depth in later Blender versions.
- Face based 3DGS objects would not render correctly in offline renders compared to vert based objects.
- Video file output formats would not render correctly - this has not been altered but rendering from Render mode is blocked until an image output type is chosen to prevent users from guessing the problem.
- Applying modifiers or exporting while viewing a 3DGS mesh as a point cloud would give an 'Evaluated geometry from modifier does not contain a mesh' error.
- Applying the Rough Mesh modifier would sometimes give an error.
- After Render mode rendering completed - the viewport 3DGS objects would be cleared / needed refreshing.
- Face based objects with color edits would sometimes not preserve color edits in Render mode.
- SH values wrong in Render mode after an object was rotated.
- Color Banding artifacts in Render mode render.
2. Important Notes and Tips
Reading the full documentation is recommended.
If you do not have time right now and want to get started immediately, you should at least check these points and the Quick Guides.
- Blender 5.1 and above is supported, earlier versions of Blender will not work with v5.0 of the addon. For earlier Blender versions, use earlier versions of the addon - however they will retain many of the now fixed bugs.
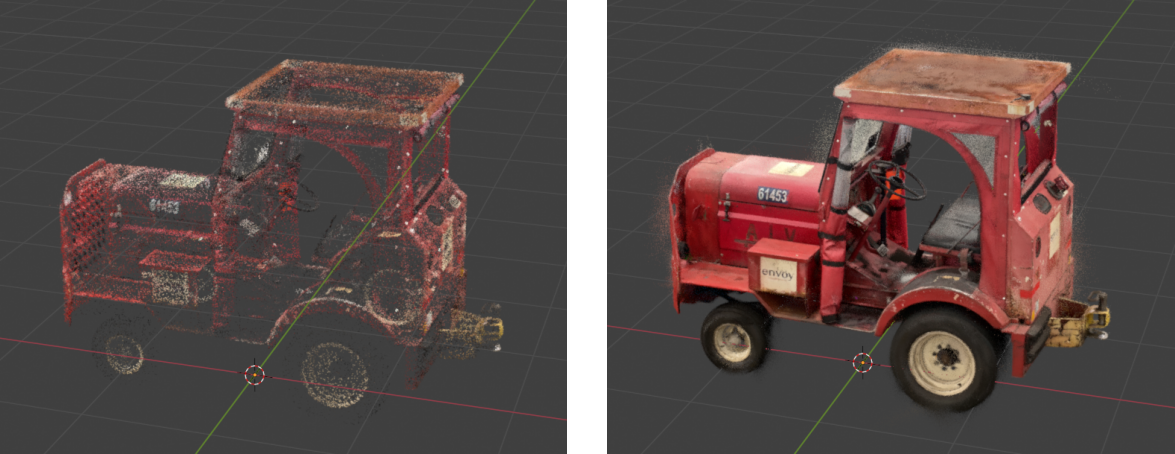
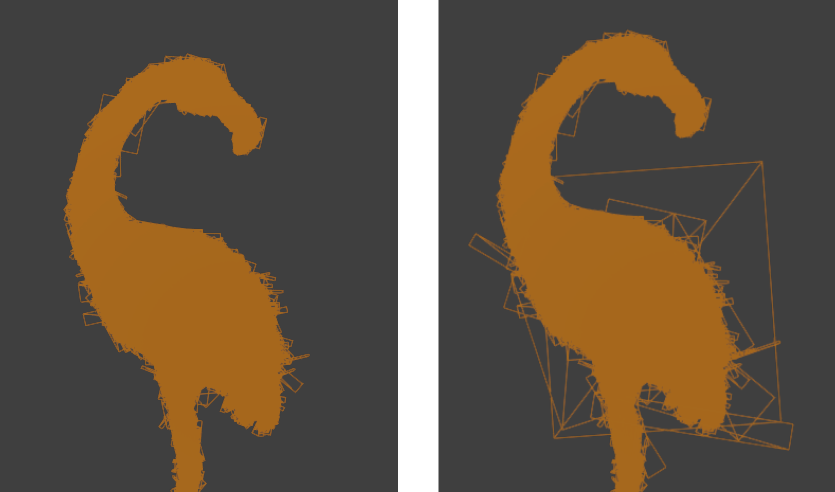
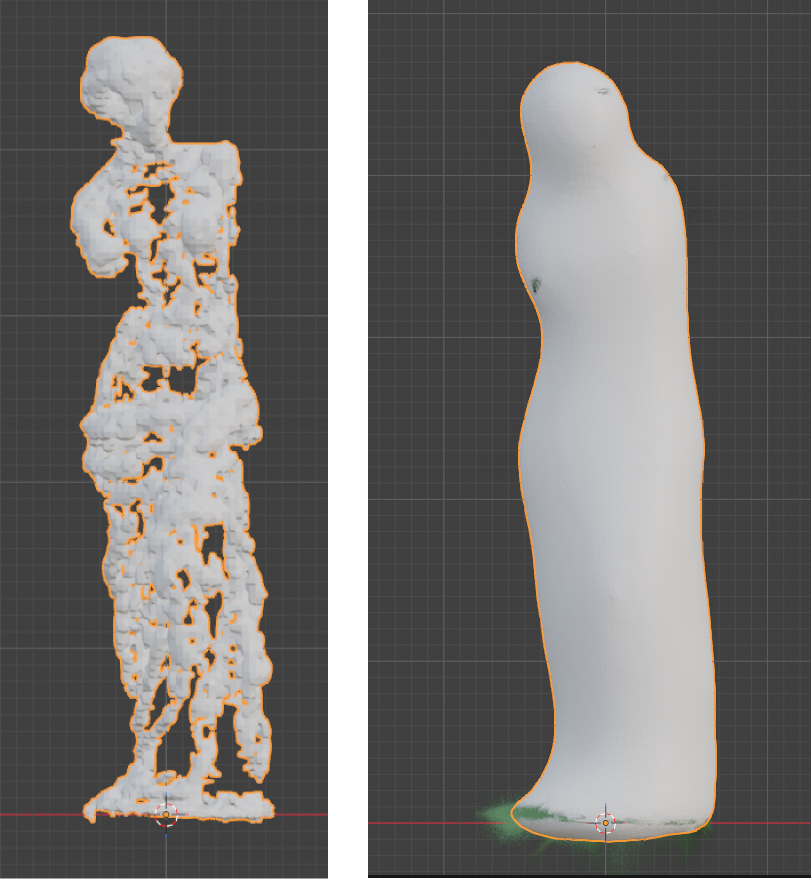
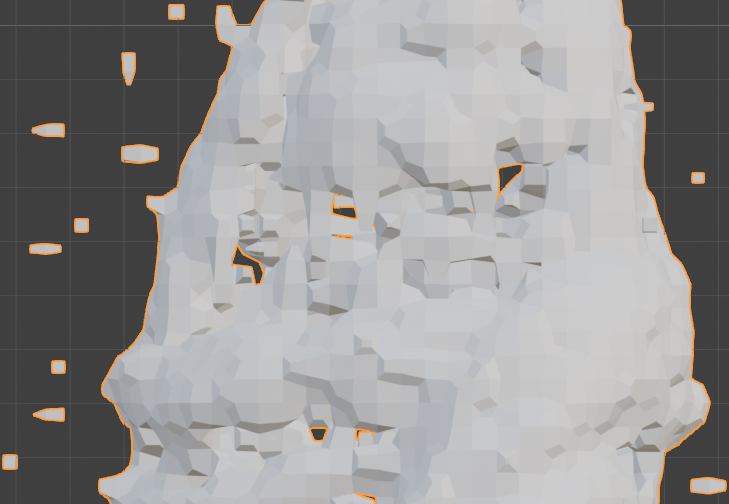
- In Edit Mode: Once imported, Gaussian Splat scans are converted into a single object a single face per 3DGS point; often thousands or millions of polygon faces. To accurately display the 3DGS object, these faces need to be ‘updated’ to face the current view/camera. The process of updating faces can be very performance heavy - especially if done continuously. So, any work that can be done to reduce the number of faces will improve performance. Render mode does not have this limitation.
- One major limitation, compared to a program like Z Brush or Houdini has long been Blender's ability to handle heavy data. For this reason, heavy operations like Rigging or Light Baking have been listed as experimental. Trying to use these processes on a full scene scan will likely take forever to bake and/or crash Blender. Only use these processes on smaller, single object scans.
- A 3DGS Mesh that has been bound to a proxy mesh, or has rigging data should not be edited (points added or removed). Cached data is bound to each existing vertex, editing the vertex count will corrupt the data. Rigging or Light Baking should be performed after all editing. If you must edit the mesh inbetween those processes - first restore the original state, edit, re-bind/store lighting then continue.
- Duplicating a 3DGS object that has an associated Proxy Empty, cached rigging data or lighting data can cause duplicate data references for the addon to try and read from - which can cause problems. If you want to make duplicate copies of an object for Render mode, use 1 single 'master' object in edit mode, and instead duplicate the Proxy Empties. Disable sdfgsdf the empties retain their current positions when switching modes.
- The Mesh-2-GS function requires that .OBJ models are fully triangulated and a corresponding texture and .MTL file are in the same folder.
- Only 3DGS .ply files can be imported and used with the addon. If you try to import a non-3DGS .ply (point cloud) file, you may encounter an error such as 'no field of name f_dc_0' or similar.
- In Edit Mode: Faces cannot be updated while in orthographic view. If a 3D viewport in orthographic view is found in the current window – the 3DGS object will turn into a warning text object.
- In Edit Mode: While moving objects or animating and setting up cameras – it is best to display the 3DGS object as a point cloud or with camera updates disabled. When you are all set up – enable camera updates or jump into Render mode
- In Edit Mode: Try using only 1 sample when using HQ Mode if Shadeless shading is enabled.
- In Render Mode: If depth sorting is incorrect (wrong parts of the scan appear in front or areas look cloudy) try moving the view with Shift and Middle Mouse.
- 3DGS objects imported with legacy versions of the addon may not work accurately with this/newer versions. Try maintaining add-on versions within a projects scope.
3. Quick Guides
Since version 4 of the addon, the addon offers several modes and workflows. We will cover the most condensed version of each workflow here, skipping over more advanced features.
Video Quick Guides are available on our YouTube channel.
https://www.youtube.com/@3D-Tools-by-KIRI-Engine/videos
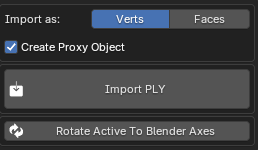
Importing a full scene 3DGS scan for making a render.
- Open the addon N-panel in the 3D Viewport. Find the 3DGS Render addon.
- Select Edit from the Active Mode
- Select the Import menu
- Import as Verts (better general performance)
- Keep Create Proxy Object checked.
- Press Import PLY and select your scan.
- After importing, select the object and press Rotate Active To Blender Axis to put the scan in the correct orientation for Blender.
- If you do this and plan to export your scan later – read the export warnings about rotation and applying transforms carefully.
- The import object will have Camera Updates set to Disable Camera Updates and will appear as vertices (or faces if imported as faces). If you wish to see colour, experiment with using Show as Point Cloud or Enable Camera Updates, Though disabling these will give best performance during editing.
- Rotate, move and scale your 3DGS object into the desired position. You can now animate your camera as wished. Having the 3DGS shown as vertices can make working much faster.
- Optional - Camera Culling: If you want to see live camera updates but want to improve performance: Add a camera into your scene. Place the camera roughly, just so you can see some parts of your scan when looking through the camera. Enable Camera Updates, enable Use Active Camera and play with the Frustrum Cull and Distance Cull settings.
- Once your scene is ready, you can select Render mode from the Active Mode menu.
- From the Render mode, select the Render sub menu. Decide if you want to Render Animation or leave unchecked for a single frame.
- It’s best to Render a single frame to check settings. If you are happy with the results, you can render a full animation.
- If you want to composite the 3DGS scans with mesh elements in the scene, tick Combine With Native Render. Press Render. Rendering will begin offline and cannot be cancelled once started – to check progress you can open the output directory location to watch image creation. If you are using Combine With Native Render, temp files will be rendered first, followed by composite images.
Editing a 3DGS scan for exporting to external 3DGS software and viewers.
- Open the addon N-panel in the 3D Viewport
- Select Edit from the Active Mode menu.
- Select Import.
- Disable Create Proxy Object.
- Import as Verts. An import window will open, select your .PLY and press Import PLY.
- We will use import as verts to quickly remove large areas. We will use face import/editing later.
- Use Blender’s native edit mode features to remove or edit points. You can also head to the Modifiers menu for non-destructive editing. Modifiers are covered further in their own sections. Pressing C to activate Blender's brush tool is a great way to paint a selection quickly.
- If you rotate or scale your object: use the Apply 3DGS Transforms and Colour button and read the warnings carefully.
- Once bulk edits are done, in Object mode press Ctrl+A, and select Convert Vert 3DGS to Face 3DGS. Viewing faces in edit mode can be useful for diagnosing erroneous splats quickly.
- If you select a single point in a face, make sure to use Ctrl Numpad+ to select the full face before deleting.
- Once you are happy with your edits, go to the Export menu and set and Output Directory.
- Hit Export PLY and wait for your new file to be written..
- The export function will apply all current rotations and scales to the exported .PLY.
Creating a 3DGS object from a mesh object.
- Open the add-on N-panel in the 3D Viewport
- Select Mesh 2 3DGS from the Active Menu
- Validate Mesh, Texture and .MTL will check that your file meets the requirements for conversation. This is best left checked.
- Press ‘Select .OBJ’ to open an import window.
- Select an .OBJ file to convert and press ‘Mesh 2 3DGS’
- Wait a few minutes – when the conversion is complete the output folder will open. A new .PLY file will be found in the folder.
4. Installation
- Blender 5.1 and above is supported, earlier versions of Blender will not work with v5.0 of the addon. For earlier Blender versions, use earlier versions of the addon - however they will retain many of the now fixed bugs.
- To install the addon make sure you have downloaded the .ZIP file (3dgs_render_by_kiri_engine_version number) .ZIP to your computer.
- Drag and drop the .ZIP from a file browser into Blender’s 3D viewport.
- A confirmation window will appear. Hit okay and the addon will be installed
5. Edit Mode Vs Render Mode
The addon offers 3 distinct modes of working:
- The legacy ‘Edit’ mode retains edit, modifier and animation functions of earlier versions of the addon. In this mode 3DGS files appear as mesh objects. Performance is slower but the full range of normal mesh edits are available.
- Render mode offers real-time and offline rendering of Gaussian Splat objects without the performance constraints of mesh objects.
- The two modes combined offer a full workflow to jump between editing and rendering 3DGS scans
- Using the Mesh-2-3DGS features, mesh objects can be converted to 3DGS .PLY files providing an image texture and associated .MTL are available.
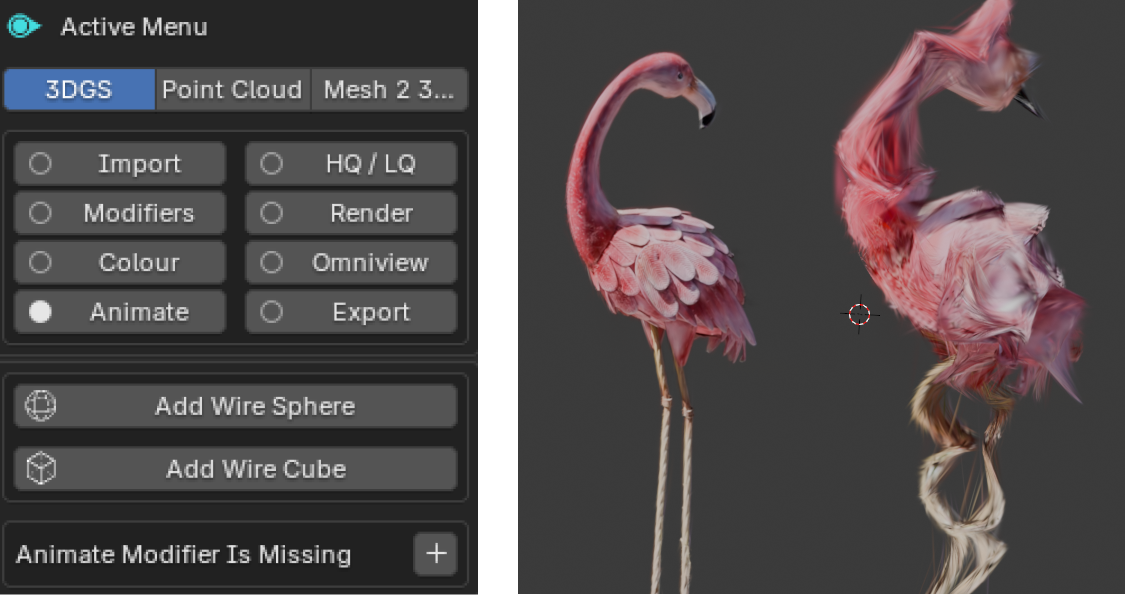
6. Interface Overview
The addon interface is split into three sections. We will look at each section individually in greater detail later:
Active 3DGS Object
Buttons and settings here will affect only the active object, if one is selected.
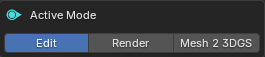
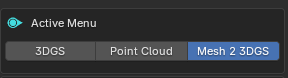
Active Mode
Here you can select either the Edit or Render modes, or to use the Mesh 2 3DGS function.
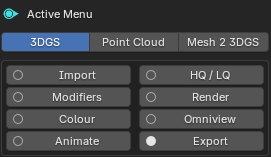
Active Sub Menu
Depending on the currently active mode, different sub-menus will be shown.
7. Active Object Menu
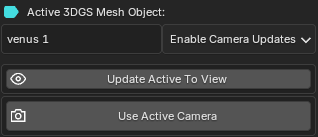
If a 3DGS object is active, this menu will show offering controls for the active object.
Camera Updates can be enabled or disabled individually for each object. Or the object can be shown As A Point Cloud
Immediately after importing, updates for an object are set to disabled.
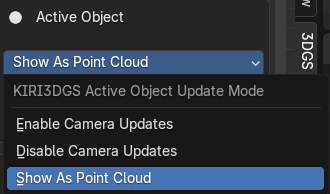
When moving 3DGS objects around in the scene it is recommended to disable updates or Show As A Point Cloud to lighten performance requirements.
If you know you are not going to update a 3DGS object again (it may be used in a static camera shot or you are only editing, not rendering) you can apply the 3DGS Render modifier. After doing this the object can no longer be updated to the camera view but performance may be better.
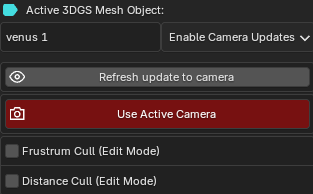
If Enable Camera Updates is selected two new options will be available - Update Active To View and Use Active Camera.
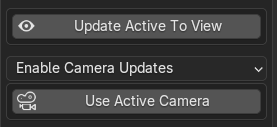
Update Active To View will update only the active 3DGS object (not the whole scene) to the current view.

Use Active Camera will automatically make the active 3DGS object continually face towards the scene’s Active Camera.

If the active object has Use Active Camera enabled new options will be shown for Frustrum and Distance Culling. These features can be used to remove points inside/outside the camera view, and by distance to the camera. The effects are only visible in edit mode. If you want camera culling displayed also in the Render mode, you can add a Camera Cull modfiier from the Modifier panel.
If the active object has Show Point Cloud enabled new options will be shown.
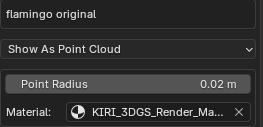
The size of points can be controlled by the Point Radius and the material for points can be specified.
8. Edit Mode - Import
From the Edit mode, Import sub menu, you will see the option to Import as: Verts or Faces.
The choice will depend on your needs. For performance considerations, bulk points removal, or mostly using the Render mode – Verts can be a better option. For very fine detail manual editing, Faces can be better.
Vertex painting is only available to objects imported as Faces.
At any point you may convert an object between vert or face based from the Ctrl+A menu in Object mode.
Create Proxy Object will create the linked Empty object needed for the real time Render mode. If this is disabled on importing the object can be created later (covered in the Render section0)

After pressing Import PLY, a file browser will open.
You can choose a .PLY to import. Depending on the size of the 3DGS scan and your computer specs, you may need to wait for the import to be completed.
Once imported, the new object will have Camera Updates set to Disabled by default. It can be best to Disable Camera Updates or enable Show As Point Cloud while working and Enable Camera Updates when finished positioning and editing.
Since most 3DGS viewers and software do not share the same axes as Blender, you can select the imported object and press Rotate Active To Blender Axes to quickly set it upright.

- Do apply rotation or scale transformations to the 3DGS object using Blender native Apply Scale/Rotation. Use the addons Apply 3DGS Transforms from the Ctrl+A menu.
- Updating faces while the viewport is in orthographic mode is not possible. A warning text object will show if faces are updated with orthographic views on the screen.
9. Edit Mode - Modifiers
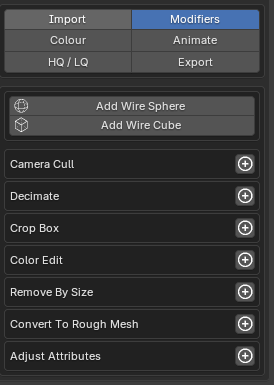
Many of the modifiers on this menu work to reduce the number of points or faces in a 3DGS object. Though they can also be used for animation purposes. It is advised to use Camera Cull at the very least for good performance. Modifiers can be added with the + icon next to modifier name

After adding a modifier, the modifier can be toggled on/off in the viewport by clicking its name. A modifier can be applied or removed with the tick and trash can buttons. If a modifier has previously been applied or removed, it can be re-added multiple times with the + button.

Remove SH Attributes
This button is not a non-destructive modifier, it is a one time destructive operation. It removes all view dependant Spherical Harmonic attributes from the object. This can save memory and sometimes processing time in Edit mode, but should only be used if you know what you are doing.
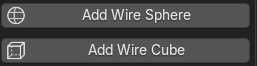
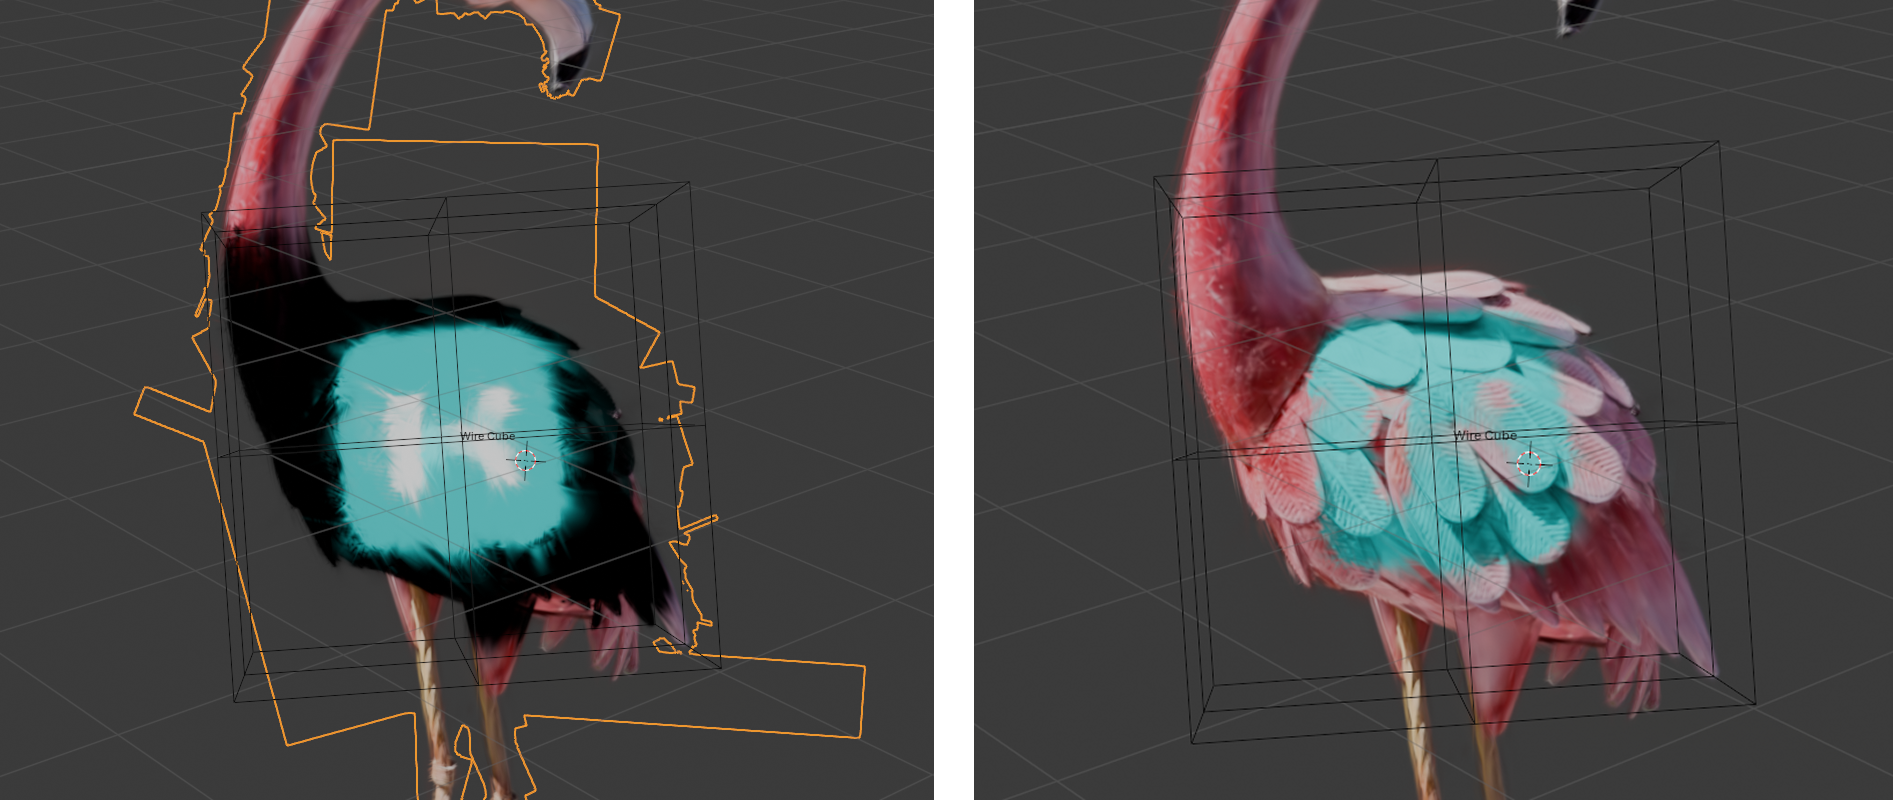
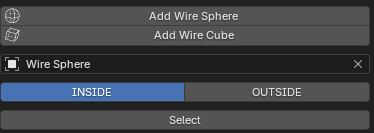
Add Wire Sphere / Cube
This will add a wireframe cube/sphere to the scene. This object will not render and can be used as a target for various modifiers (e.g. crop box)
Camera Cull
This is often the most important modifier in terms of performance and usability. The modifier will remove faces outside of the camera bounds and by distance to the camera.
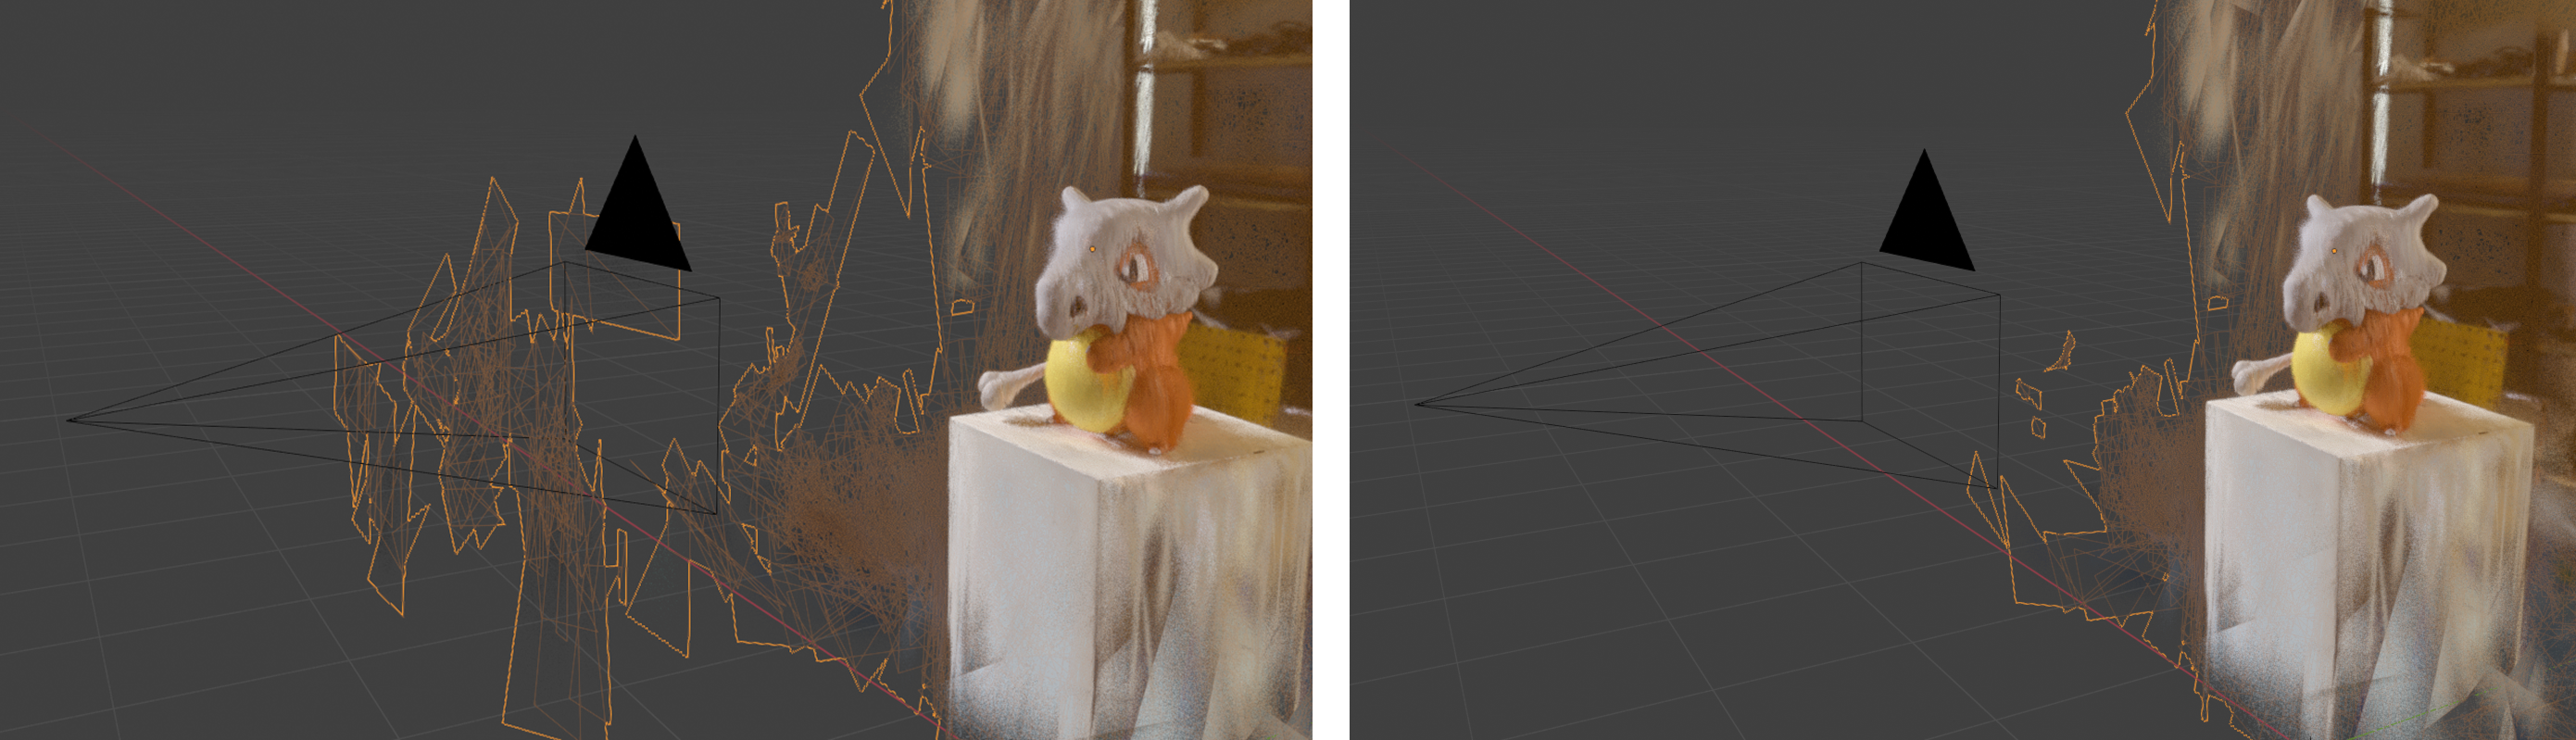
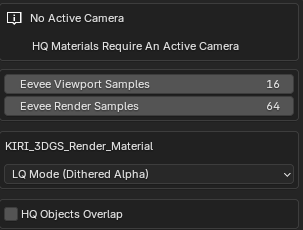
An active camera is required to use it – if the modifier is enabled and no active camera is present, a warning will show:
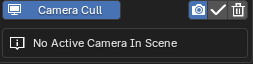
The modifiers settings must match the active camera and scene settings (focal length, render resolution etc) – you can set this up quickly with Auto Set Up.
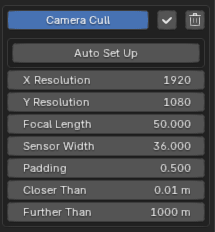
The distance between the camera bounds and deleted faces is controlled with Padding. It is recommended not to set this a 0 to avoid flickers when moving the camera. Faces can by distance to the camera using Closer Than and Further Than values.
Decimate
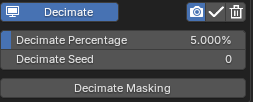
This will remove a percentage of the total number of faces from 0 - 100. The Decimate Seed will change which faces are removed.
- It can be useful to use a high number while working to improve performance, then drop this number during rendering.
- Removing any number of faces can be helpful – so a low number like 5% can be used, and the modifier applied to improve performance
- The selection of faces that are decimated can be masked by enabling Decimate Masking and selecting a mask object.
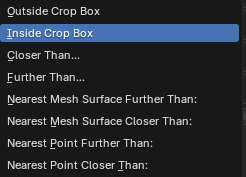
Crop Box
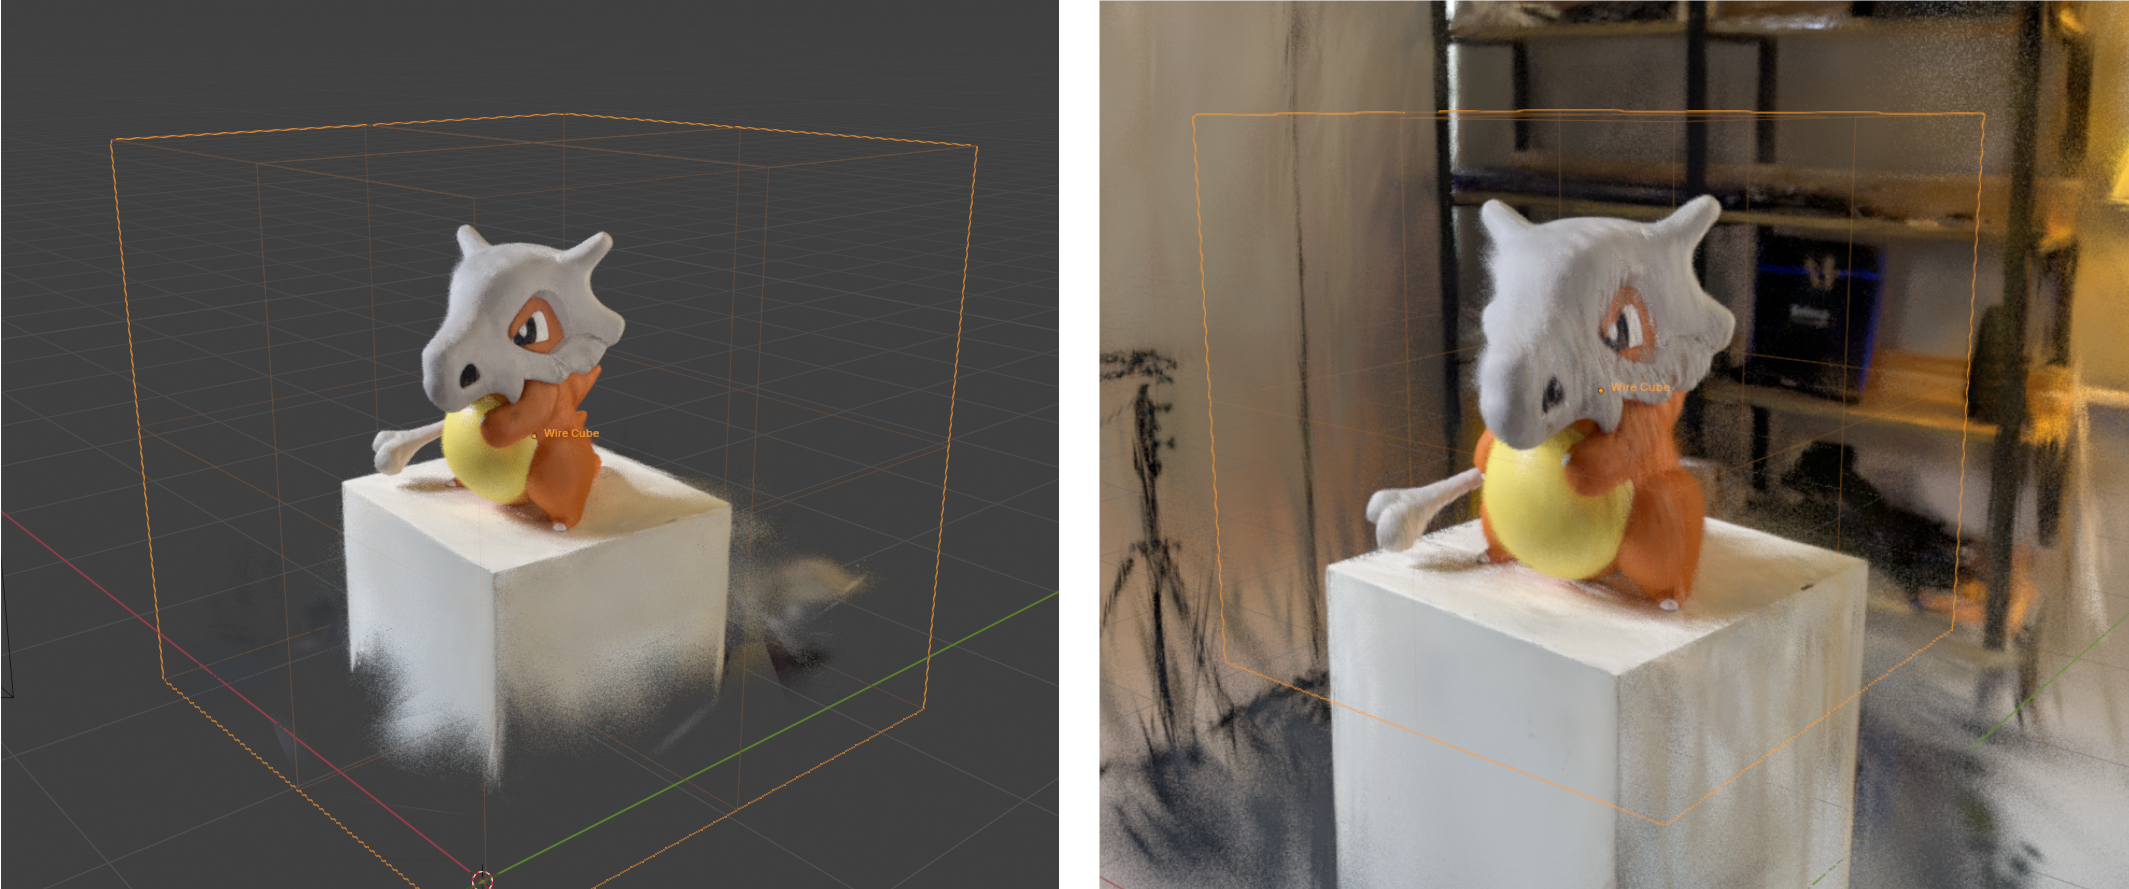
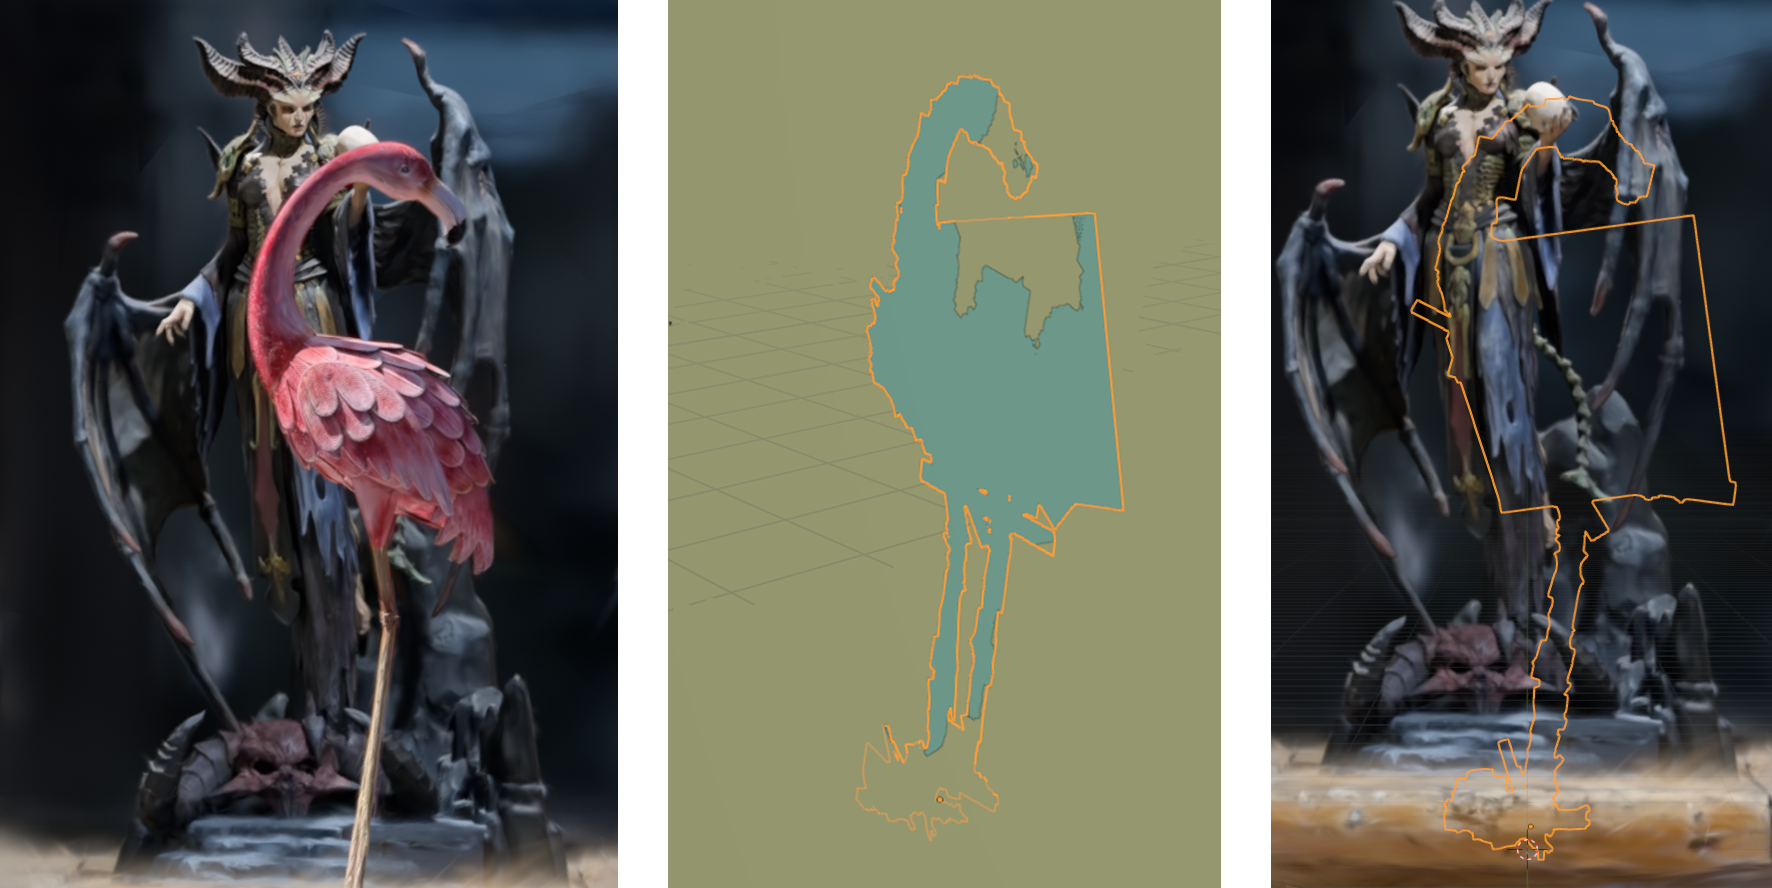
This allows you to specify a crop object or collection and a method of cropping. Faces or points Inside, Outside or by distance to the crop object/s origin, nearest point or nearest surface can be removed.
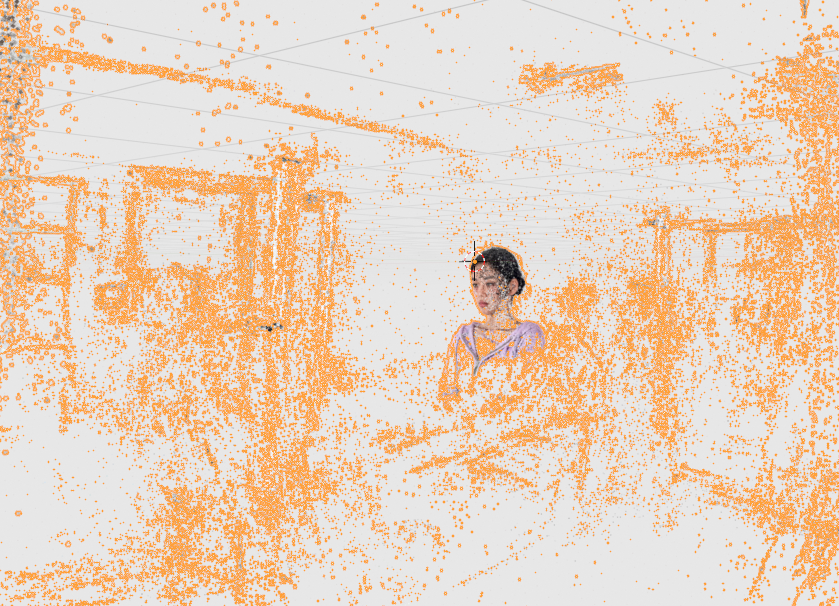
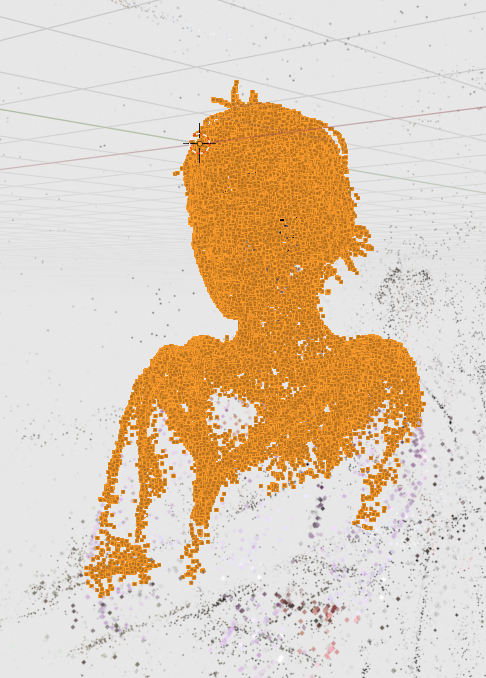
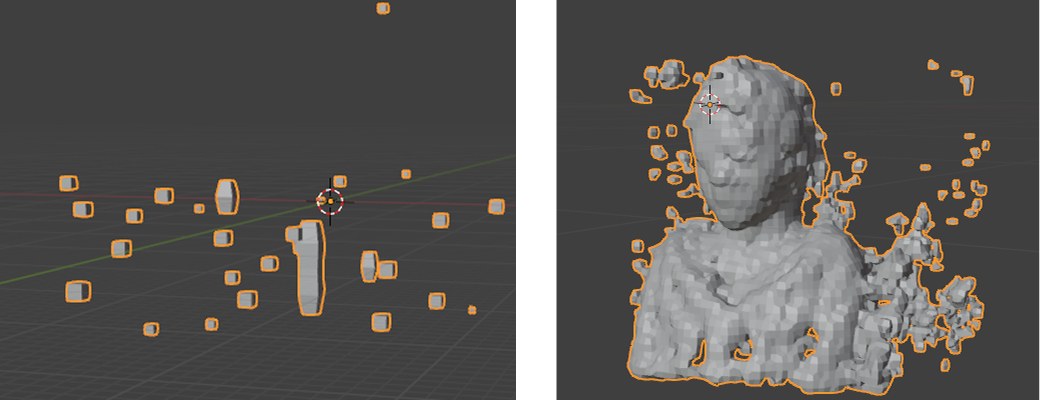
Auto generate crop object will attempt to automatically create a crop object based on the most focussed cluster of points. This is a great way to quickly remove background points. Pressing the button will give several options:

- The Mode is an under-the-hood preset for how quickly or aggressively you want to remove points. Quick is usually advised.
- If you are getting bad results, changing the Filter Epsilon to a higher number is the first course of action. The epsilon value is relative to the total scale of an object – hence the need to vary it for different scans. The higher the value, the less points will be removed (more points in the final object).
- The Filter Min Points can usually be ignored unless you’re an advanced user. The process deletes points based on points sparseness or proximity to its neighbours. Filter Min Points determines the number of points required to be within a found cluster to keep them save (deleting sparse versus tightly grouped points. A lower number would preserve more points and vice versa.
- Filter Fast Mode can sometimes speed the process up at the cost of accuracy.
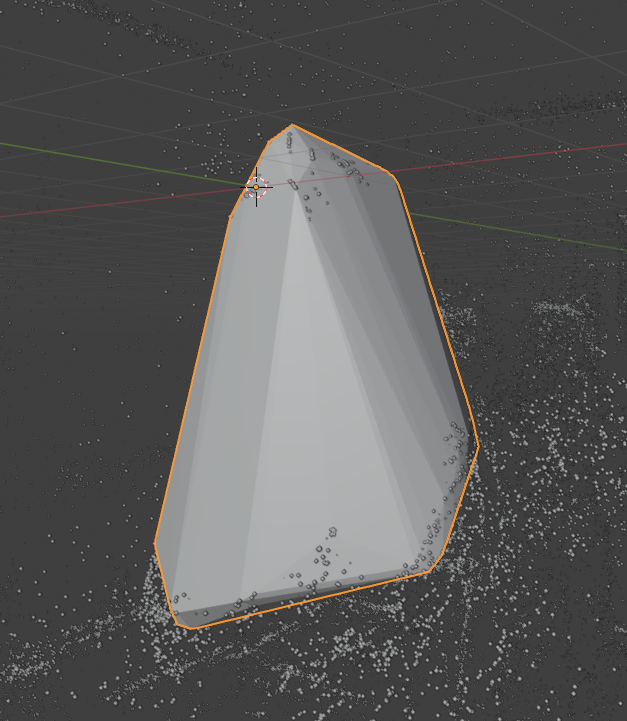
- By default, the new object is composed only of points. Create Convex Hull Object will create a mesh object encapsulating the remaining points
Original 3DGS Object:
Auto Crop Object – Epsilon 0.03 (Default)
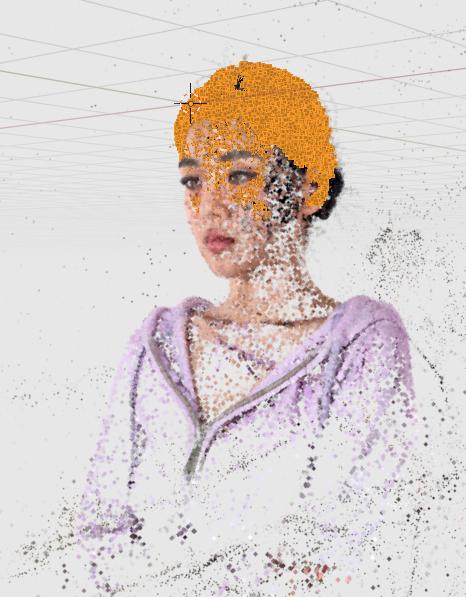
Auto Crop Object – Epsilon 0.08
Auto Crop Object – Epsilon 0.08 – Create Convex Hull Object enabled
- The created object can be specified as the Crop Object within the Crop Box modifier.
- Default point cloud objects work well with the Nearest Point Closer/Further Than option.
- Convex Hull objects work well with the Inside/Outside Crop Box option.
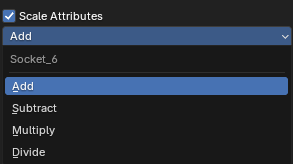
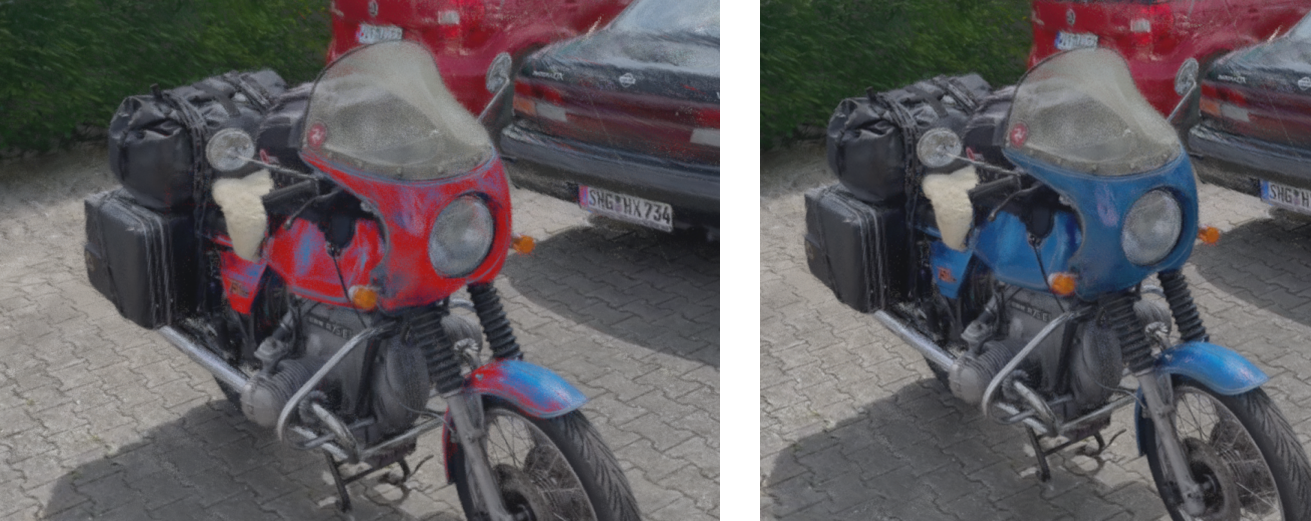
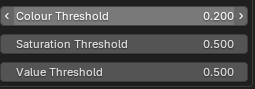
Colour Edit
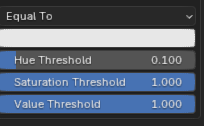
Faces are removed according to their colour. A colour selection and a removal method can be set. Faces can be removed if their colour is Equal To, Not Equal To, Darker Than or Brighter Than the selection colour
The colour selection can be finetuned with hue, saturation and value thresholds.
The selection of faces that are affected by the Colour Edit modifier can be masked by enabling Colour Edit Masking and selecting a mask object.
Due to Blender limitations – red values may be very difficult to select.
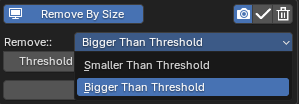
Remove By Size
This will remove faces based on native 3DGS scale attributes
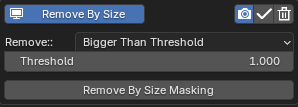
You can remove faces Bigger or Smaller Than Threshold and set a Threshold value.
The selection of faces that are affected by the Remove By Size modifier can be masked by enabling Remove By Size Masking and selecting a mask object.
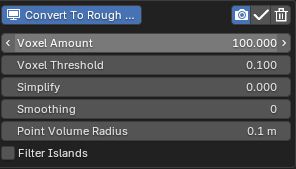
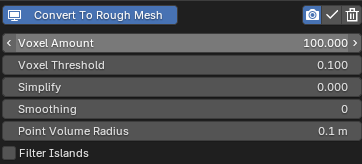
Convert To Rough Mesh
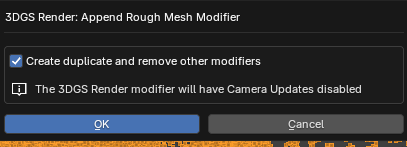
This will turn a 3DGS object into a rough manifold mesh – useful as a Crop Box object, for shadow casting or for creating a Proxy Object for Rigging and Light Baking.
After pressing the + icon to add the modifier you are given some options:
- Enabling Create duplicate and remove other modifiers will create a duplicate object of your currently active object.
- The new object will have all modifiers applied and be given the Convert To Rough Mesh modifier.
- If this option is disabled, the active object will be given the modifier and it’s Camera updates will be set to Disable Camera Updates.
Once added your object may look like a sparse collection of cubes, or a defined mesh depending on the input.
The mesh quality can be adjusted with the Voxel, Simplify, and Smoothing settings.
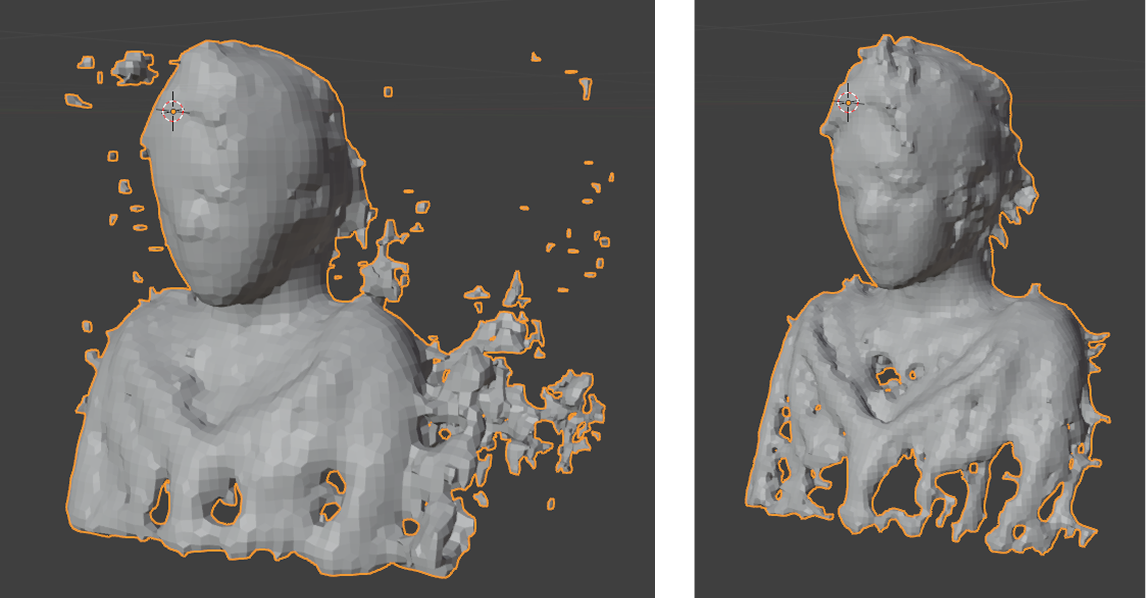
To isolate the largest mesh island component, you can use Filter Islands. By adjusting the Island Threshold value, you can remove mesh islands bigger or smaller than the threshold.
After filtering islands and adjusting voxel values:
Adjust Attributes
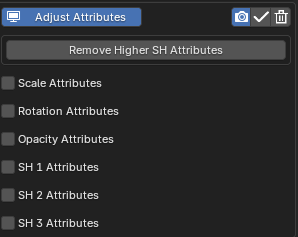
The internal data used to give Gaussian Splats their metallic, reflective and special appearances is stored as various attributes such as f_rest_0, f_rest_1 etc.
Their names mean very little to the average user, and most programs do not offer the ability to edit this data easily. The Adjust Attributes modifier allows you to easily play with this data to see what experimental results you can get.
SH and Opacity attribute changes are only visible in the higher quality Render mode- hence, this modifier is the only one which can be easily edited while in Render mode, with the parent/mesh 3DGS object selected. Scale and rotation attributes changes
Attribute values to change can be enabled and the math operation to affect their current values can be specified.
Since 3DGS Attributes can react extremely to small changes, is it best to make very slight edits. Large value edits can cause freezes or a Blender crash.
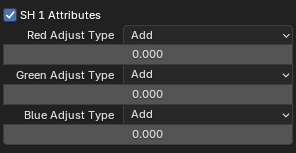
Importantly for the Rotation Attributes, you are adjusting the internal rotation values, not the normal rotation values of the faces displayed in the Edit mode.
After attributes have been adjusted on a parent/mesh object – use Update Scene while in render mode to see the effects of any SH or Opacity changes.
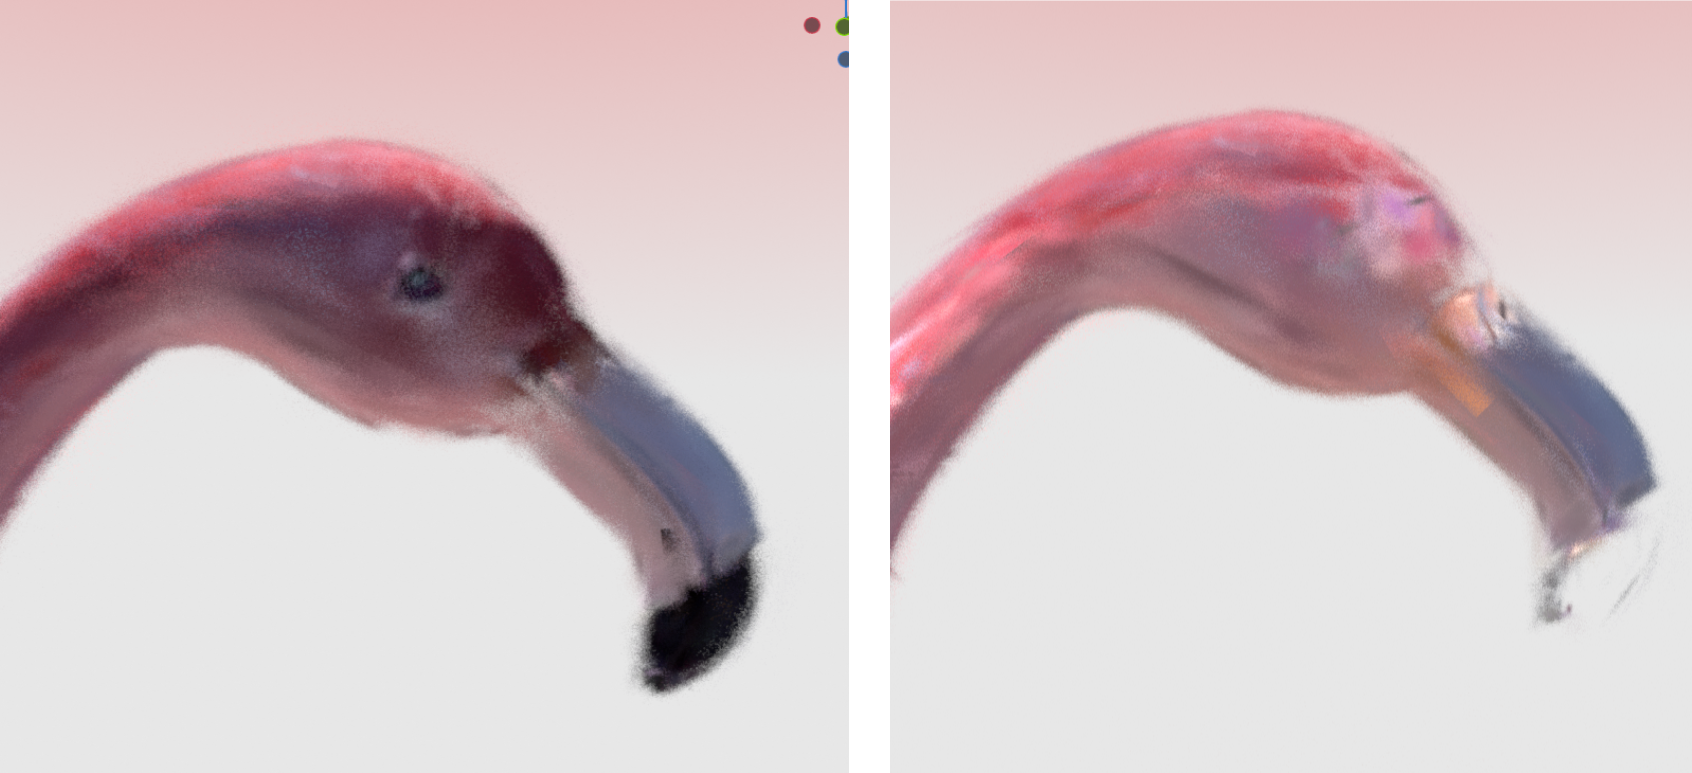
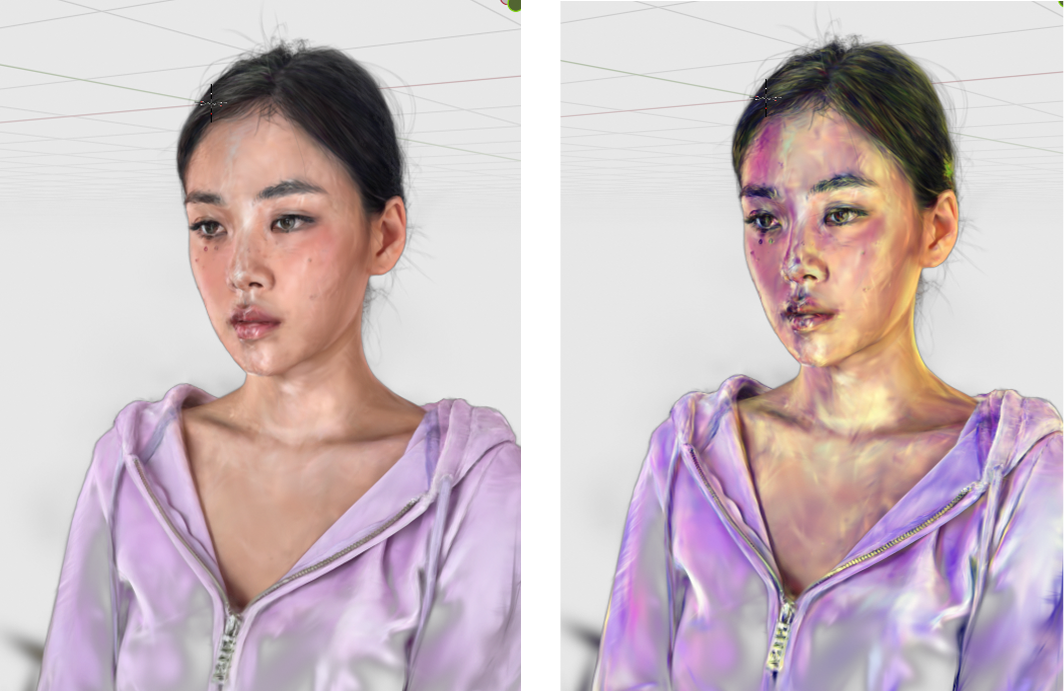
Before and after editing SH3 values:
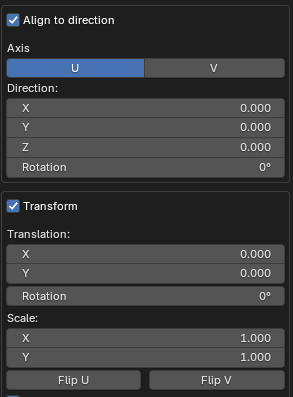
UV Edit
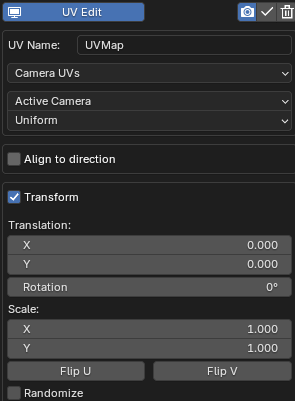
The UV Edit modifier can be used to create, or edit existing UVs on an object. This can be useful in creating stylised effects when using image textures in Edit mode.
- The name for the created UVs is set in UV Name.
- UVs can be created with Face Unwrap (like Blender's UV Reset), or by the Active or Custom Camera object.
- UVs can be aligned to a specific world direction, transformed, rotated and flipped.
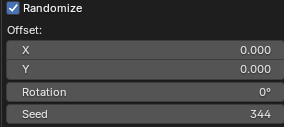
- If Randomize is enabled, and random offset or rotation can be applied to each UV island.

10. Edit Mode - Colour
The Colour menu allows you to paint, texture and perform basic colour edits on the active 3DGS object. These edits are all exportable and will be written to the exported .PLY file.
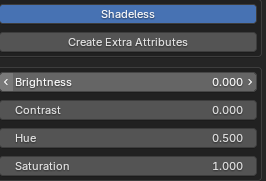
Shadeless
At the top of the Colour menu, you can toggle Shadeless lighting on/off. When shadeless is enabled, the object will not react to the lights or World lighting in the scene. If shadeless is disabled, the object will use a Principled BSDF shader and react to lighting.

Create Extra Attributes
For advanced users, greater control can be gained by manipulating the material directly within the shader editor – where named attributes can be used to control values.
Enabling Create Extra Attribute will create some extra, useful attributes inside the material’s node tree such as face area and random per point.

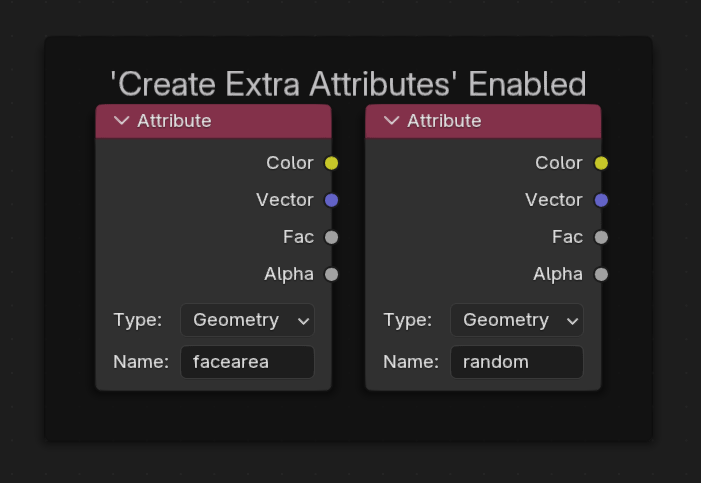
Creating extra attributes can be costly performance-wise, so this is disabled by default.
We will cover these attributes more in the shader section.
Basic Adjustments
Under extra attributes we have controls for basic colour edits including brightness, contrast, hue and saturation. Their controls are self-explanatory.
Active Colour Menu
There are many colour functions available within the addon, so the colour menu has its own sub-menu: Active Colour Menu. From here you can select which advanced colour operations to perform. If an advanced colour operation is enabled, that option will be highlighted red on the menu.

The apparent resolution of any colour edits will be determined by the 3DGS objects number of splats and splat scale.
Selective Colour Adjustments
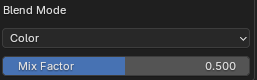
It is possible to target a specific colour within your object and replace that colour with another colour, and specific blend mode.
This can be performed up to 3 times using different colours. They are listed on the Active Colour Menu as Selective 1, Selective 2 and Selective 3

Inside each selective adjustment, you can specify a colour selection/target and a colour to change to/blend with.
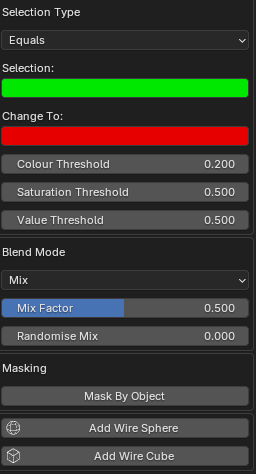
You can adjust the selection with the hue, saturation and value threshold sliders.
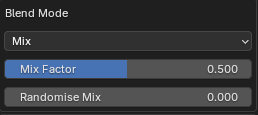
You can control the replacement method and strength with the Blend Mode and Mix Factor. A more natural look can be achieved with the Randomise Mix.
The selection of faces that are affected by selective colour edits can be masked by enabling Mask by Object and selecting a mask object.
Vertex Paint
3DGS objects can be painted directly using Blenders native vertex painting features.
Objects imported as Verts cannot be vertex painted and will need to be converted to faces.

Vertex painting can be enabled first by toggling Enable vertex Painting.
Pressing Start Painting will enter vertex paint mode. The brush settings for painting are available from Blender’s default vertex paint menus. Either by right clicking or from the top header.

Faces or points currently selected in Edit mode can be masked with the mask toggles.

If you are unhappy with your painting and want to return to the original state – Reset Paint will revert all paint edits to their original form.

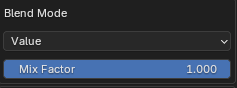
The style of colour replacement and replacement strength can be controlled with the Blend Mode and Mix Factor controls.
All paint edits can be masked by enabling Mask by Object and selecting a mask object.
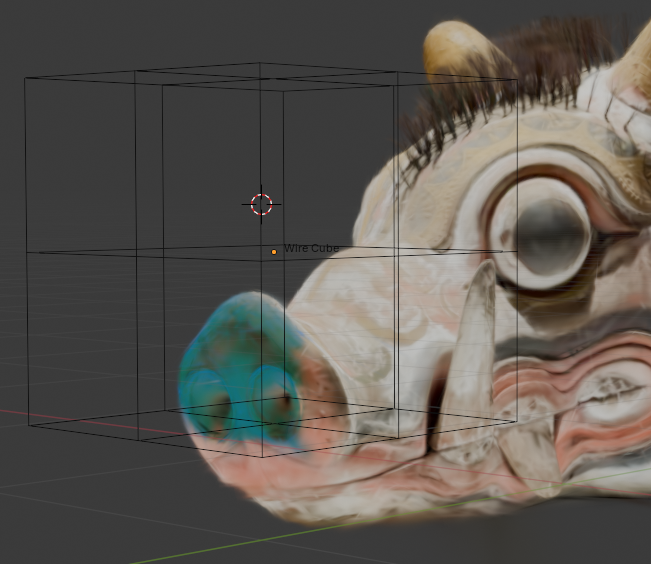
Image Overlay
Image Overlay allows you to use an image texture to affect the splat colours.
The feature can be enabled by toggling Enable Image Overlay.

If a desired image texture is already present in the Blend file, it can be selected from the Image ID search bar. Or the folder button can be used to select and import an image directly.

The style of colour replacement and replacement strength can be controlled with the Blend Mode and Mix Factor controls.
The type of mapping used by the texture can be set using Image Mapping. Box and Camera use the box and camera mapping methods standard to Blender shader nodes.

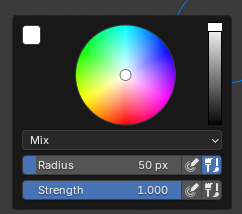
If Object mapping is selected. An object can be chosen to adjust the texture placement. The Add Wire Sphere/Cube buttons can be useful for this. Note that the objects local Z axis is considered the ‘forward’ axis.
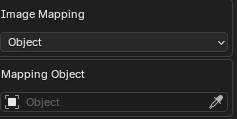
Object mapping can be used in conjunction with Masking to overlay logos or text images.
11. Edit Mode - Materials and Extra Attributes
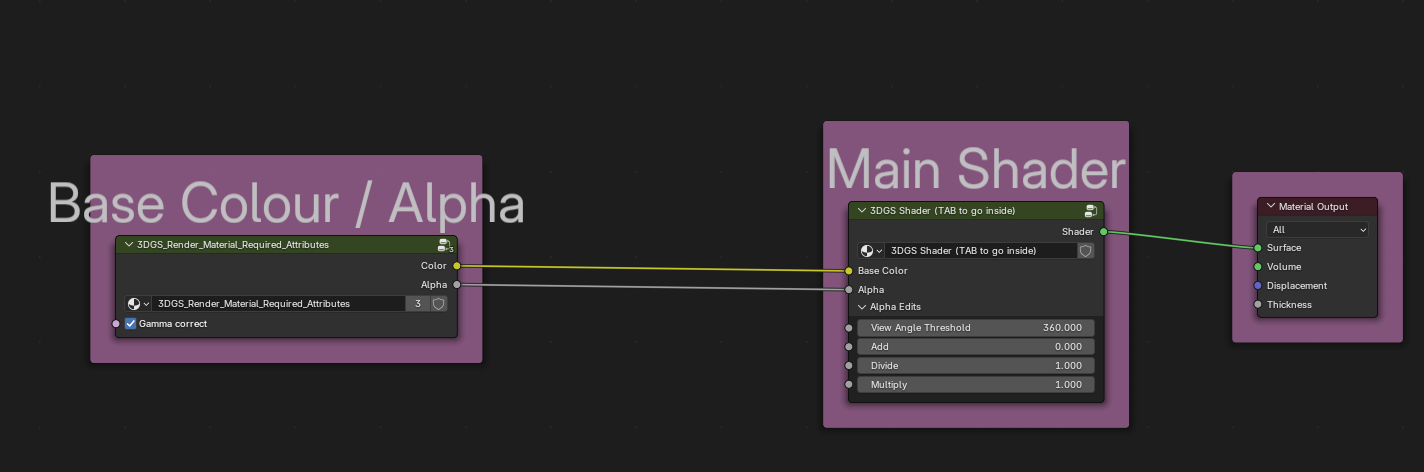
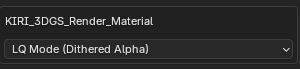
All imported 3DGS objects are given the KIRI_3DGS_Render_Material
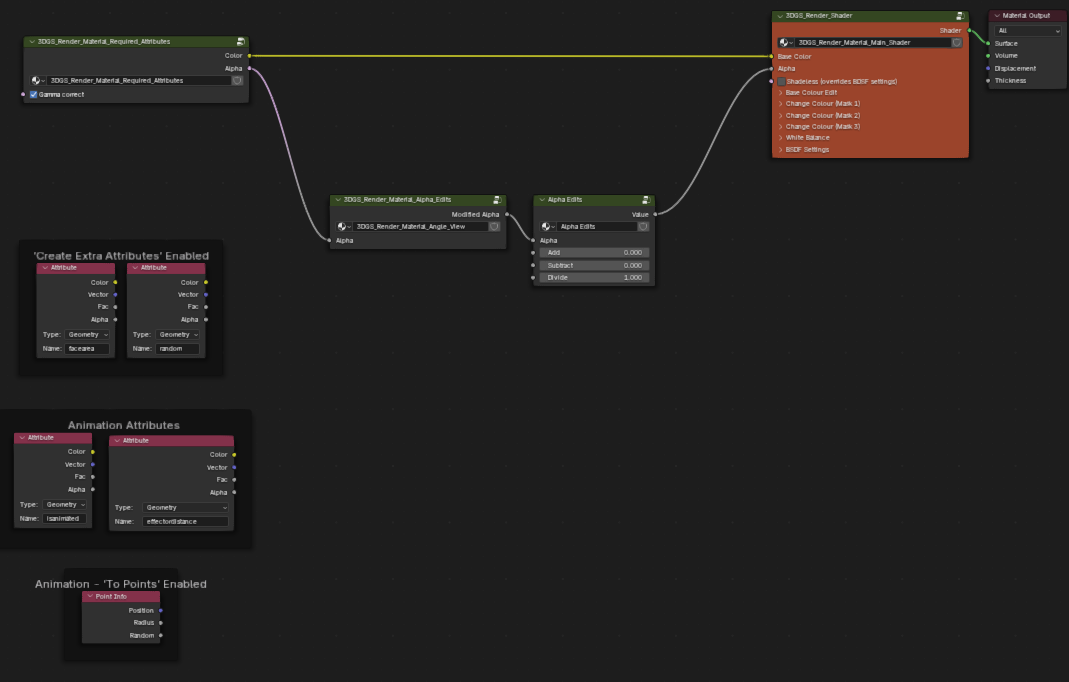
This material can be replaced, renamed, copied or altered as the user wishes. All colour edits shown on the addon interface are produced by Geometry Nodes attributes.
This means that separate 3DGS objects can have varying materials.
If a 3DGS object’s material contains the Base Colour / Alpha and Main Shader groups – addon colour edits should propagate.
- Beginner Blender users can stick to making colour edits using the addon interface.
- For Advanced users several extra nodes and groups are included for fun.
- The Alpha Edits controls on the main shader can produce some stylish animation result – and are often more performance friendly than directing editing the geometry with modifiers.
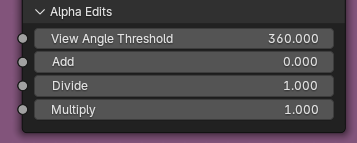
- The View Angle Threshold will make the faces transparent at set viewing angles.
- If Create Extra Attributes is enabled in the Shader menu, a face area and a random-per-face attribute can be used.
- If the Animate modifier is enabled, isanimated and effector distance attributes are available
- If Animate modifier is enabled and the To Points preset is used, the Point Info node can be useful.
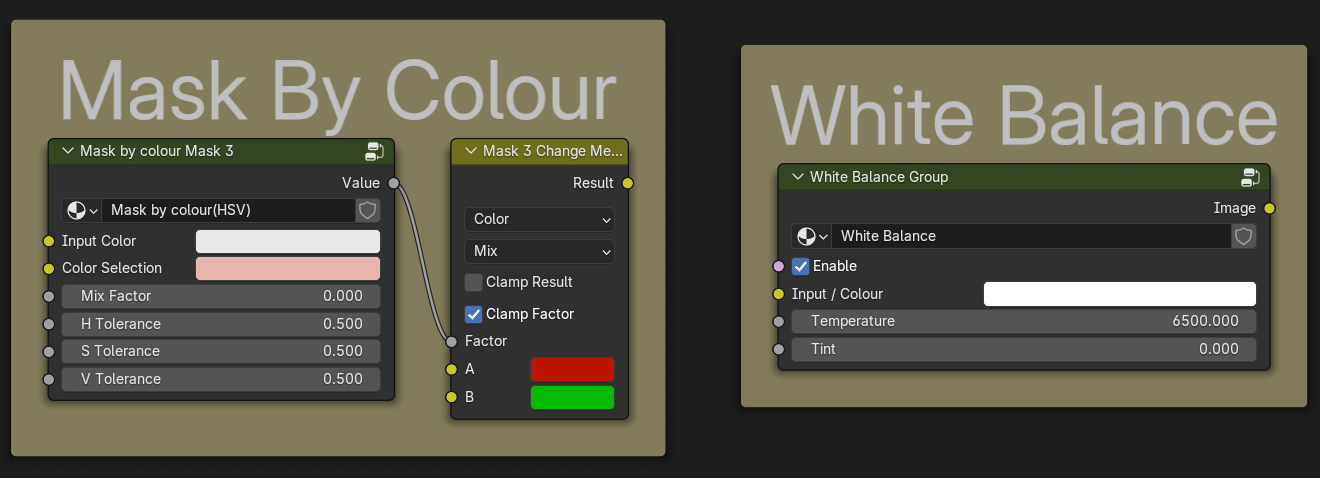
- Mask By Colour for selective colour editing, and White Balance groups are also included.
- Colour changes made inside the shader are not exportable. Only changes made by the addon and Geometry Nodes will be exported.

12. Edit Mode - Animate
This Animate modifier comes preloaded with presets and settings to create motion graphics renders using your 3DGS objects.
Using the shader and alpha edits or shader displacement is often a more performant way to animate very dense meshes
As updating faces is already a highly performance intensive task, it is extremely recommended that you:
- Use and apply as many modifiers as possible to reduce face counts.
- Work on an isolated object/separate part of your scan, rather than a full 3DGS scene.
- Use the Decimate Animated slider to reduce the number of faces affected by the animation
Animation effects can be Global (applied to the whole object), or by distance to a selected object or collection.
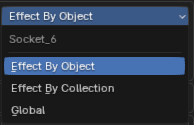
If Effect By Object or Effect By Collection is chosen, a distance threshold will appear and anything below this will be animated.

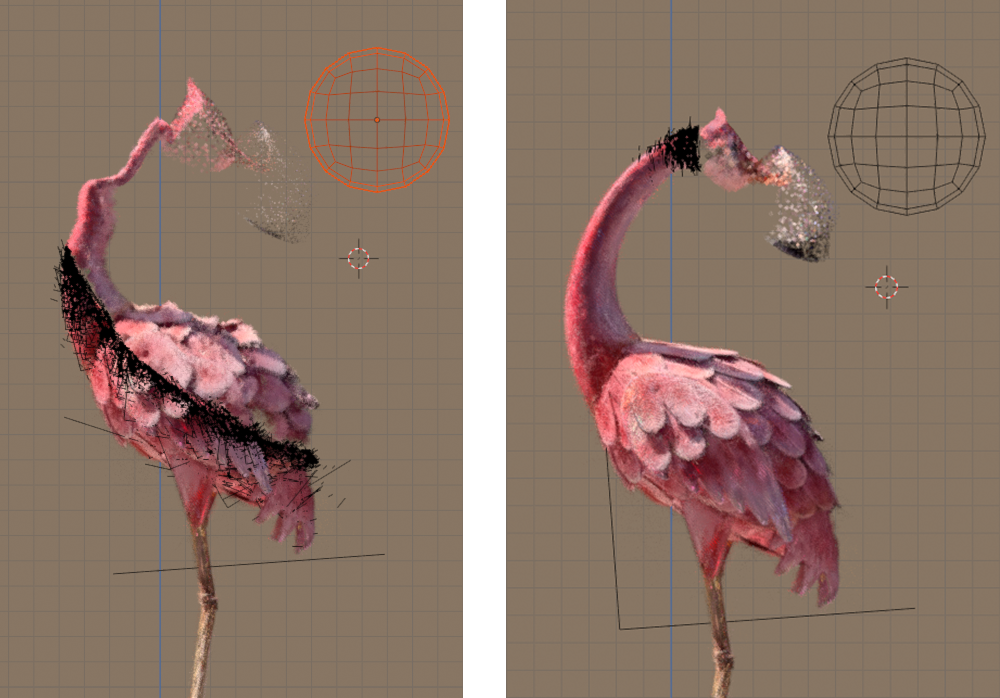
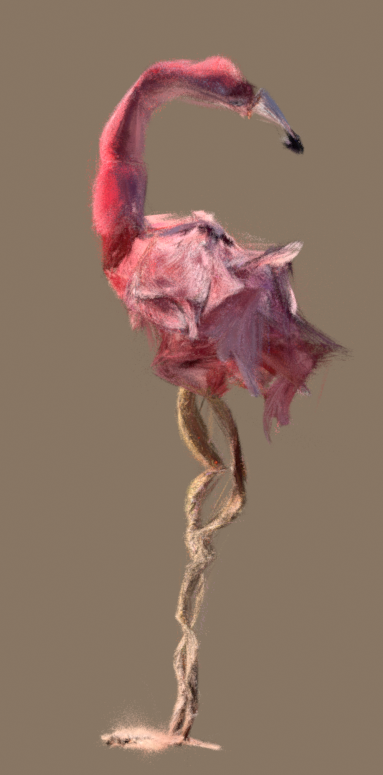
There are 3 modes of animation, Displace Only, To Points and To Curves.
Each mode supports some of the following effects:
Noise Displacement – displaces faces based on the standard Blender Noise texture
- This is available in all animation modes.
- There are controls for the Noise Strength and Noise Scale.
- The Time Evolution Multiplier will change the noise seed as the timeline is played. This is performance intensive so set to 0 as default.
Voronoi Displacement – displaces faces based on the Blender Voronoi Noise texture
- This is available in all animation modes. The results are more chaotic looking than the standard Noise Displacement.
- There are controls for the Noise Strength and Noise Scale.
- The Time Evolution Multiplier will change the noise seed as the timeline is played. This is performance intensive so set to 0 as default.
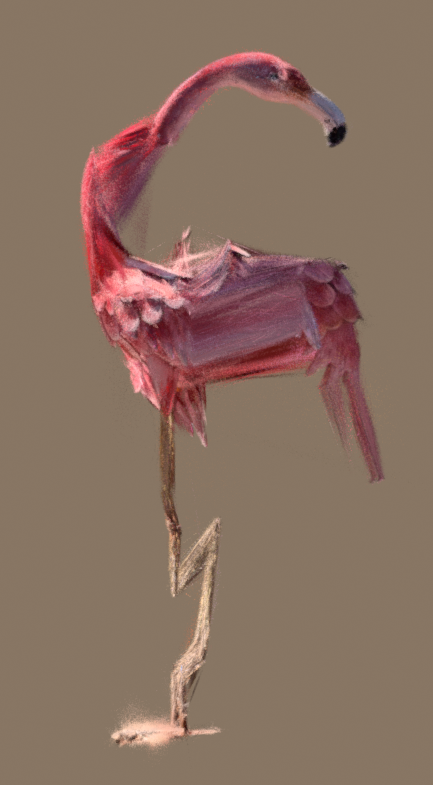
Pixelate – points of each face are snapped to Blender’s world grid, forming grid patterns
- This is available in all animation modes.
- There are controls for the Pixelate Mix and Grid Scale.
To Points – animated faces will turn into points
- This is available in the To Points animation mode.
- Any animated faces will turn into points.
- All displacements/pixelate will contribute to point positions.
To Curves – animated faces will turn into curves
- This is available in the To Curves animation mode.
- Any animated faces will turn into curves.
- All displacements/pixelate will contribute to curve positions.
13. Edit Mode - HQ / LQ
Material transparency has two modes in Blender: dithered and blended.
In the addon and documentation we refer to dithered materials as LQ (low quality) and blended as HQ (high quality).
- LQ mode can appear quite grainy and will give flickering artifacts in renders.
- HQ mode is much smoother and should remove flickering artifacts.
- Due to Blender material limitations, LQ mode supports depth of field, but HQ does not.
By default, the HQ Mode menu will show a warning if no camera is in the scene.
HQ mode requires an active camera. After adding a camera, you will see more options.

Each material on your active object will be shown and can be toggled between HQ and LQ modes.
HQ mode is more performance intensive while working in the viewport. You should work in LQ Mode, and enable HQ Mode to preview final renders. When using HQ Mode, you can often get acceptable results using 1 sample, which makes rendering much faster.
If you have multiple 3DGS objects that intersect each other, you will need to enable the Objects Overlap? button.
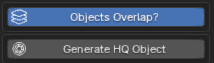
After enabling Objects Overlap? – a new button will be shown – Generate HQ Object, pressing this will do a few things:
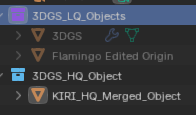
- Move all current 3DGS objects (we will consider them LQ objects) into a new collection named 3DGS_LQ_Objects (we will refer to these as LQ Objects).
- These LQ objects will be hidden from view and render (while in HQ Mode).
- A new object will be created, KIRI_HQ_Merged_Object (we will refer to this as HQ Object). and placed into a new collection, 3DGS_HQ_Object.
- This new object is a merged instance of all objects in the 3DGS_HQ_Object collection.
- While the HQ Object exists, toggling between LQ and HQ mode will toggle visibility and render for either all objects in the LQ collection, or the HQ object.
- If you have generated an HQ Object but want to continue editing/placing your LQ objects – switch to LQ mode, make your changes, then switch back to HQ mode.
- Don’t move LQ objects from the 3DGS_LQ_Objects collection while using an HQ object.
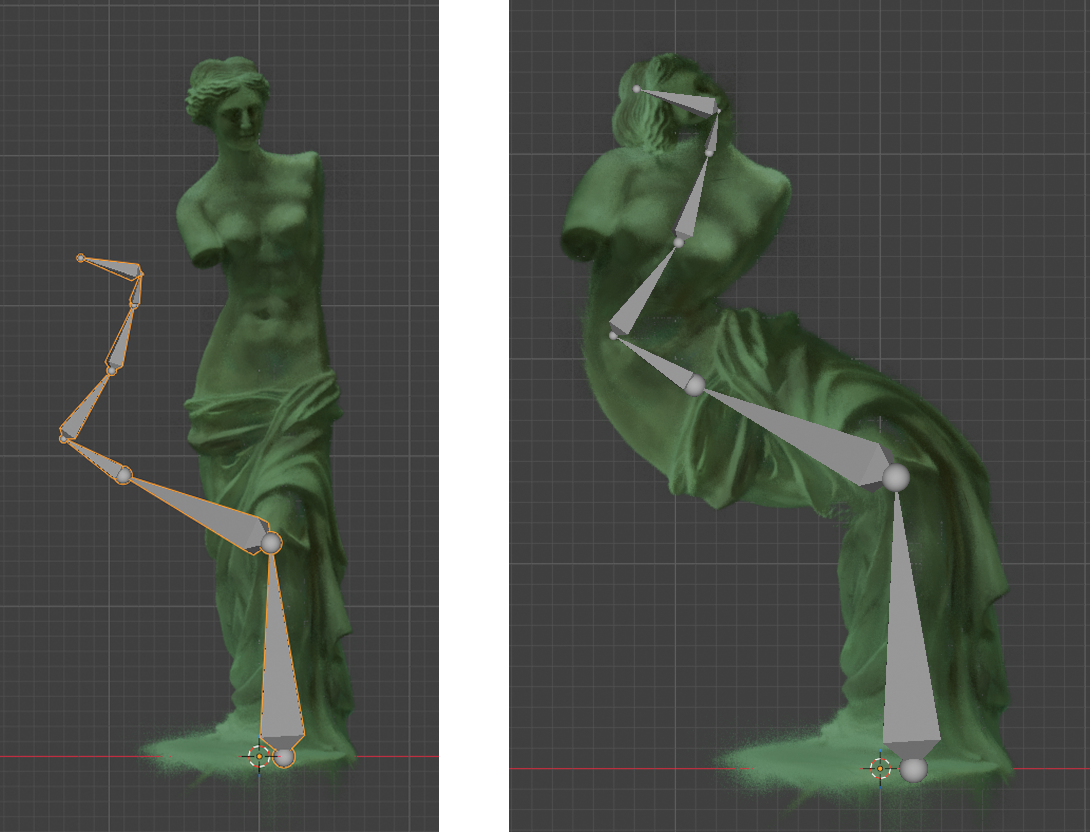
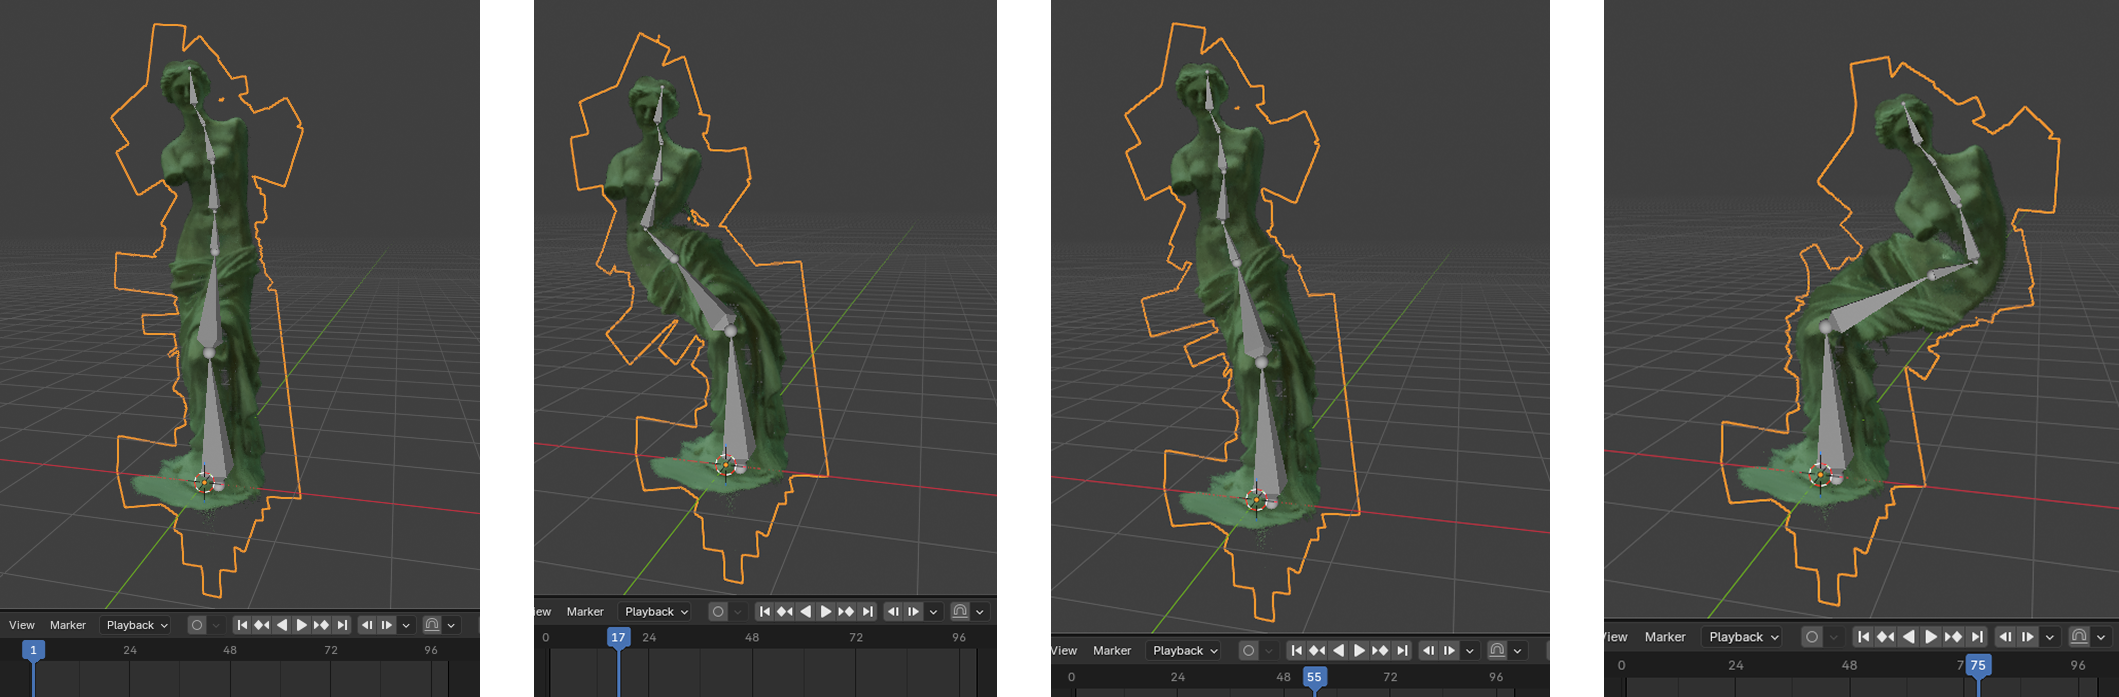
14. Edit Mode - Rig (Experimental)
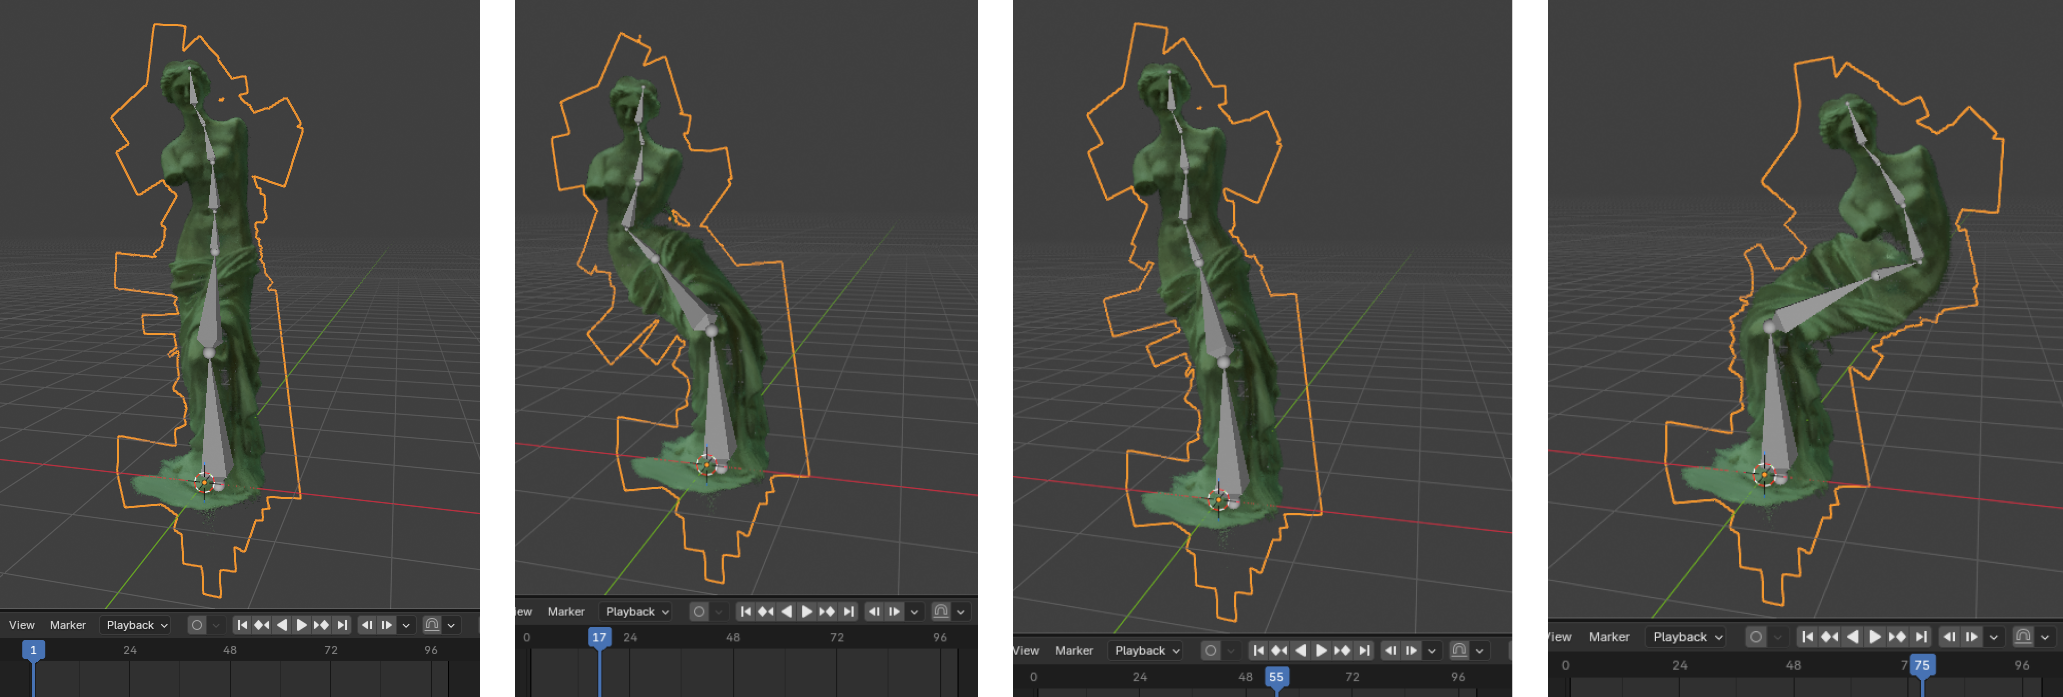
The features on the Rig menu allows us to project deformations of a Proxy Object onto our 3DGS objects - with 3DGS scale, rotation and Spherical Harmonic attributes also updating.
- Blender does not handle processing large amounts of data well. Trying to run Proxy Binding on a full 3DGS scene will likely end in crashes, freezes and frustration - hence the 'Experimental' tag on this function.
- Try running Rigging on a smaller 3DGS object or cropped scan first to test the limitations of your hardware - a good guide is to check the polycount restraints of a normal animated character.
- A demo scene with a light 3DGS scan is available for you to quickly test the feature.
Since many of the rigging settings make little sense outside of context, I'll go through a quick step by step example of using the feature here:
- Import a 3DGS object. Use import as verts for better conversion to a mesh, and for better performance.
- We need a corresponding mesh for the 3DGS object. If you used KIRI Engine for scanning, the 3DGS-to-Mesh feature will have already produced a matching mesh object that you can use.
- If you don't have a mesh object, first make sure the silhouette of your object is clean by removing points or using modifiers in the addon.
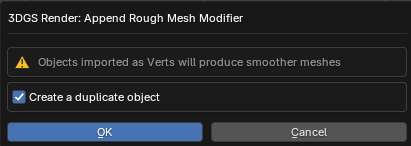
- From the Modifiers menu in the addon, find the Convert to Rough Mesh modifier.
- In the pop up, select Create a duplicate object.
- Adjust settings for the modifier until you have a mesh that matches your 3DGS silhouette better. If you can't get a good result or want better topology for rigging, you may need to manually model a cage mesh.
- Stay organised. Let's rename the mesh '3DGS Rig Proxy Mesh' and apply the Rough Mesh modifier with the tick icon.
- It's not always necessary, but it can be a good idea before rigging to apply all transforms for the Proxy Mesh from the Ctrl+A menu.
- And lets do the same for the 3DGS object, but on the CTRL+A menu, we'll use the addons special Apply 3DGS Transforms button and select Apply Location.
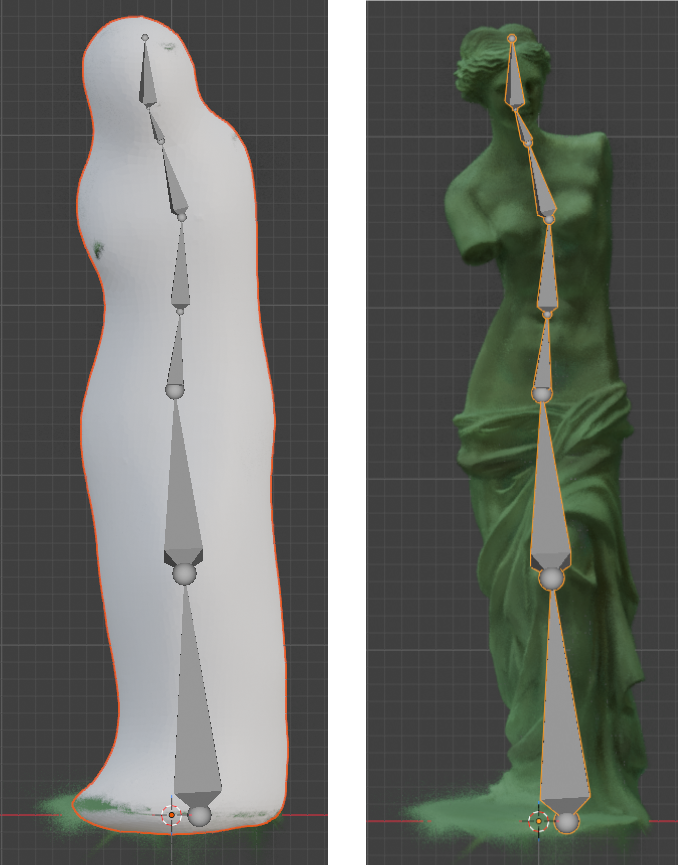
- Now rig your Proxy Mesh. You can use shape keys, lattices or other methods - since this is an experimental tool not every avenue has been tested and some bugs are probably lurking. For this example I have used a standard Armature object.
- This armature is far from perfect or beautiful, but it works for this example. Basing bone placement and rolls on the 3DGS object, rather than the Proxy Mesh can be useful later.
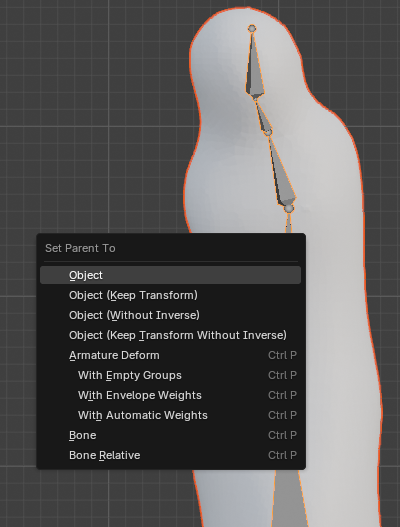
- Select your Proxy Mesh and Shift+Select the Armature, choose With Automatic Weights.
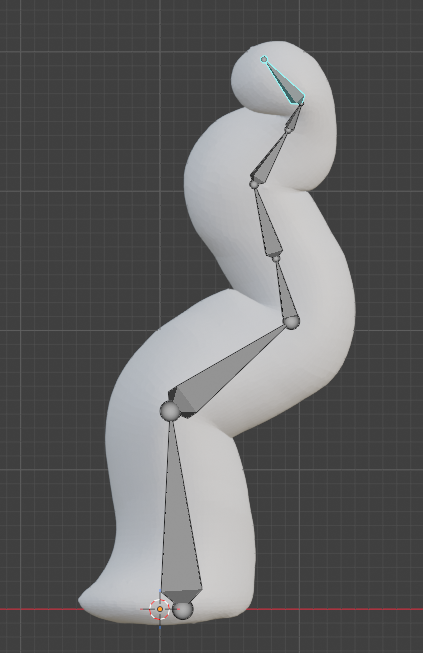
- Hopefully no errors were shown. To test the rigging, select the Armature and press Ctrl+Tab to enter Pose mode. Then select some bones and try rotating them to check out your rigging.
- Select all bones with A and clear the rotation back to normal with Alt+R.
- If we're happy with how the Proxy Mesh is rigged, we can stop looking at it, and disable it in the Viewport.
- Select the 3DGS object and back in the add-on select the Rig menu.
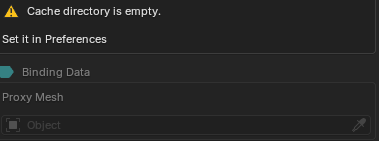
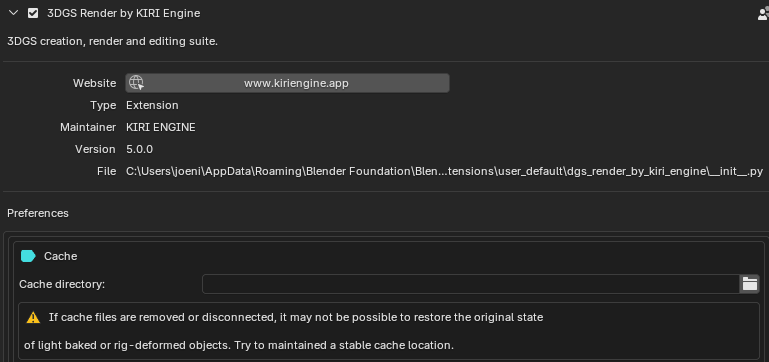
- The Rig features requires writing temp binding data files to a cache location. If this is not set the addon will show a warning before you can use Rig features.
- To set the cache, open Edit...Preferences and find the add-on's preferences. Set a stable, permanent location as the Cache directory. DON'T FORGET TO SAVE SETTINGS.
- If the cache is moved, deleted or becomes unlinked it may be impossible to continue working with baked data, or return a rig-deformed model back to it's original state. Try to maintain a stable cache between projects.
- The cache data is relative to each vertex, don't add or remove vertices once an object is bound.
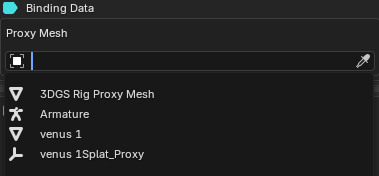
- Once the cache is set you can select your Proxy Mesh object.
- Once the Proxy Object is assigned, binding options are shown:
- For general 3DGS scans Volumetric is usually best. For surface aligned scans use Surface. Hybrid combines the best of both methods but is the most expensive.
- The Bind Samples set the quality level of the binding, higher samples increase binding time, and later, deformation transfer time.
- If Hybrid is chosen a Distance Factor is displayed, this controls which points are binded by volume and which by a surface point - the figure is a multiplier, not a discrete distance so testing multiple values is recommended if you choose to use it.
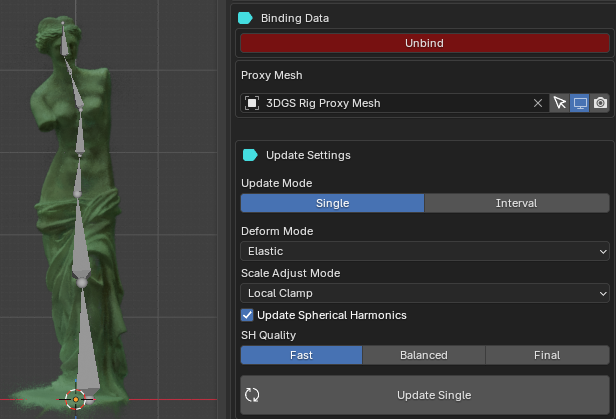
- Once you're ready, press Bind to Proxy Mesh. Once done, the Rig menu should show new options and the 3DGS object will be parented to the Proxy Mesh and its transforms will be locked.
- Looking at the Single mode first: we choose a Deform Mode. The various modes will change how splats are deformed, especially on sharp turns and corners. This is best shown by testing it out on some extreme deformations.
- Deform Mode = Elastic
- Deform Mode = Stable
- Deform Mode = Adaptive
- The Scale Adjust Mode will adjust how we scale splats that might experience extreme scale deformations. This is also is best shown by testing it out and checking deformed regions.
- Updates to Spherical Harmonic attributes can be enabled or disabled with the Update Spherical Harmonics check box. Though results will only be visible in Render mode or in exported models. The quality of SH updates can be set and will affect update times - while working it's best to use Fast, changing this to Final for renders and exports.
- Pressing Update Single will update the splats once, based on the current Armature (Proxy Rig) appearance. If no baked animation data exists, the operation will take a bit longer to both calculate and update deformations. We'll look at baking animation data soon.
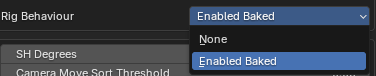
- If we jump into Render mode, we won't see any updates from our animation yet. But we do see a setting for Rig Behaviour that has an option for Enabled Baked. Showing that Render mode requires baked data.
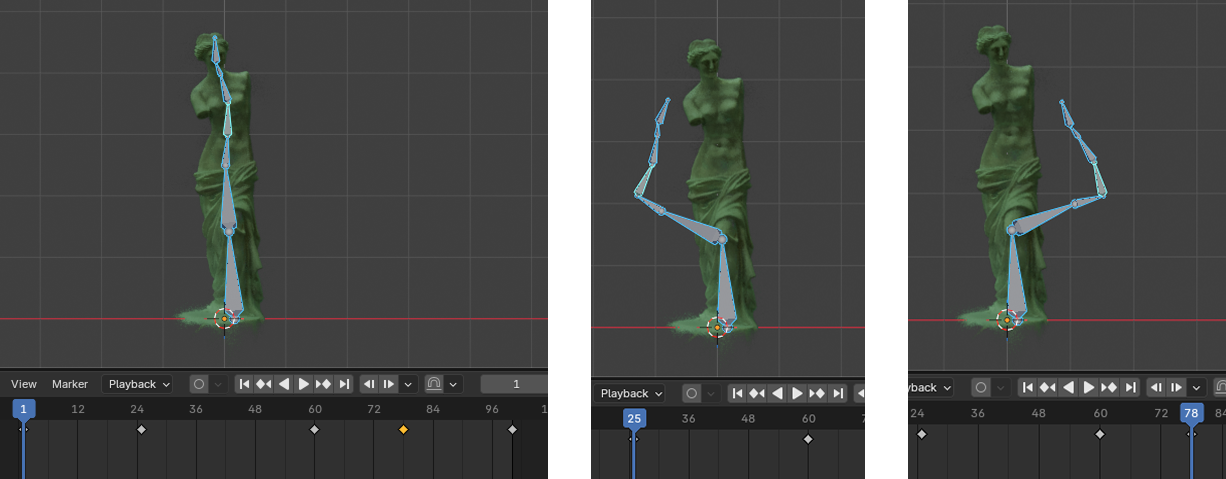
- Back in Edit mode, lets create a simple animation for our armature using keyframes in pose mode.
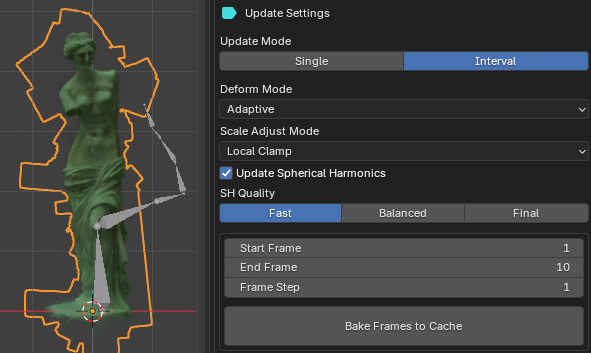
- Now with the 3DGS objected selected, on the Rig menu, jump over to the Interval mode.
- We have the same Deform and Scale adjust settings as the Single mode. But now we also see frame settings. We are going to read and bake the animation data for all the frames we choose, to the cache location set in our preferences. Set the duration Start and End Frames that you want to bake for. And the Frame Step. For testing and first tried, a small amount of frames is recommended.
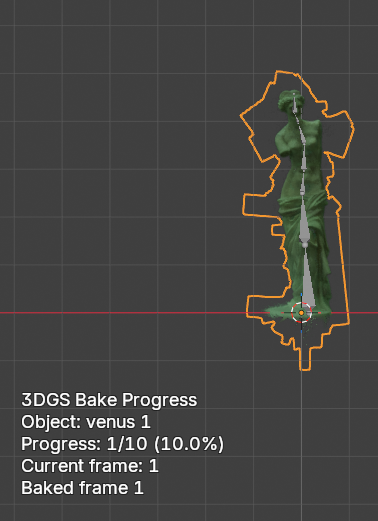
- Once ready to bake, press Bake Frames to Cache and the baking process will display in the viewport.
- Now that we have baked data, several options are available:
- Deform, Scale Adjust and SH update settings are locked. To edit them, use Clear Cache and rebake.
- In Single mode, updates will happen faster
- In Interval mode, we now have an Update Interval and Update from Cache option. This allows us to update the 3DGS option from the cached data at the set time interval.
- An interval of 0.5 is a safe default, if your scan is small enough and hardware supports it, this number may be lower but proceed with caution.
- A setting for Enable rig updates in renders is shown. If enabled, this allows this object to update animation data for Renders and Exports.
- In Render mode - Update menu, Render mode - Render menu and the Export menu, the Rig Behaviour settings can be used to update, render or export updates using the cached animated data, for any objects that have Enable rig updates in renders enabled.
- If I now play my timeline, set the Update Interval lower and Update from cache, I get watch my 3DGS object being deformed in the viewport.
- You now have a fully rigged and animated 3DGS object ready for rendering or export!
Avoid creating a mesh with holes or complex hollow areas as this can prevent Blenders Auto Weights from working.

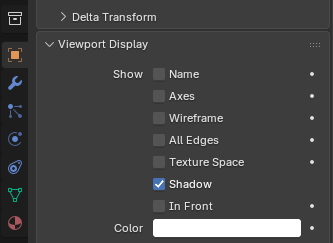
When using Armatures - setting the Viewport Display to In Front will help a lot


Don't forget to stop cache interval updates when jumping to other areas of Blender or working on something else - is easy to forget and will slow down all other operations.
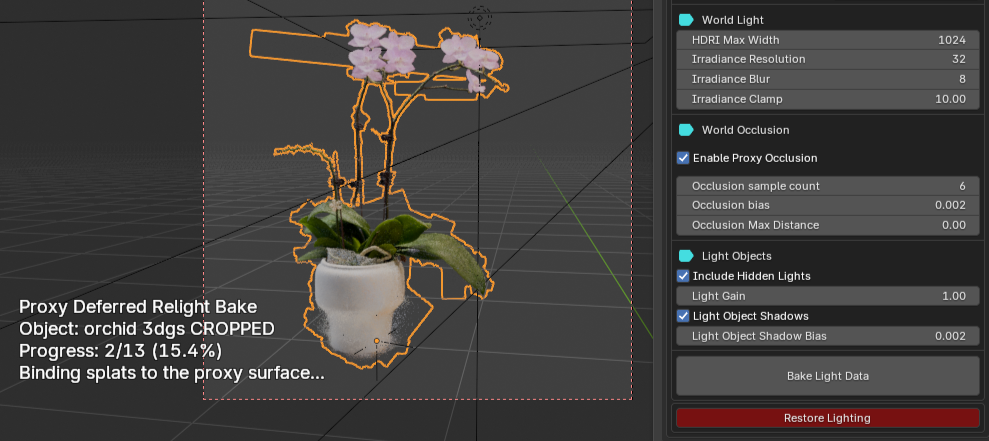
15. Edit Mode - Light Bake (Experimental)
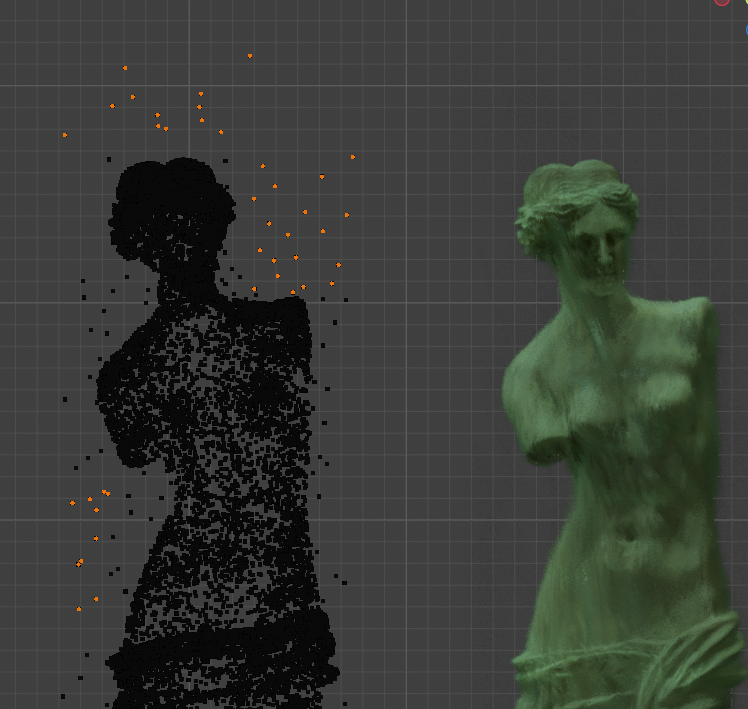
One issue with Gaussian Splatting - light is baked into the scan data itself. When trying to combine splats with other meshes, backplates or for artistic expression we want a solution to 'relight' splats. The light baking features on the addon offer some experimental functions in baking light data from a proxy mesh, to a 3DGS object.
- Experimental: Like the Rig tools, the Light Bake processes are very heavy - even heavier than rigging in fact. Trying to run Light Bakes on a full 3DGS scene is not a good idea - hence the 'Experimental' tag.
- Try running Rigging on a smaller 3DGS object or cropped scan first to test the limitations of your hardware before attempting anything heavier.
- Experimental: Right now, in this first iteration of the Light Bake function, the quality of the light bake can vary wildly from model to model, depending on the Proxy Mesh, the scan density and the scene lighting. It is a fun and creative tool to play with, but does not always give good results.
- A demo scene with a light 3DGS scan is available for you to quickly test the feature.
Since many of the settings make more sense in context, I'll go through a quick run down example of using the tool:
- Import a 3DGS object. Use import as verts for better conversion to a mesh, and for better performance. The 3DGS object I'm using is made of 118,000 points, very much at the high end for using this tool. Decimate, crop and reduce points as much as possible.
- We need a corresponding mesh for the 3DGS object. For this example, KIRI Engine's 3DGS to Mesh 3.0 made a perfect corresponding proxy mesh. If you don't have a mesh available, you can check the mesh creation steps in the Rig tutorial above.
- The Light Bake features requires writing temp binding data files to a cache location. If this is not set, the add-on will show a warning before you can use the feature.
- To set the cache, open Edit...Preferences and find the add-on's preferences. Set a stable, permanent location as the Cache directory. DON'T FORGET TO SAVE SETTINGS.
- If the cache is moved, deleted or becomes unlinked it may be impossible to continue working with baked data, or return a rig-deformed model back to it's original state. Try to maintain a stable cache between projects.
- The cache data is relative to each vertex, don't add or remove vertices once an object is bound.
- Once the cache is set you can select your Proxy Mesh object.
- When the proxy mesh is set, new options will be shown.
- The Light Bake process is split into 3 stages to allow faster iteration:
- First, we store the initial light/color data so it can be restored later.
- Then the we bake light data from the Proxy Mesh, based on the current scene and settings.
- We apply the baked data with the set light mix settings. Since data is already baked, the artistic process of mixing and applying light is a little faster (but still pretty slow).
- The baked data will reflect the current light setup, moving/changing lights requires new baked data. Due to the heavy processing required, a per-frame light bake option is not yet available or sensible.
- From the 1. Store Light menu, press Store Original Lighting to store the current lighting incase you want to restore it later with Restore Lighting.
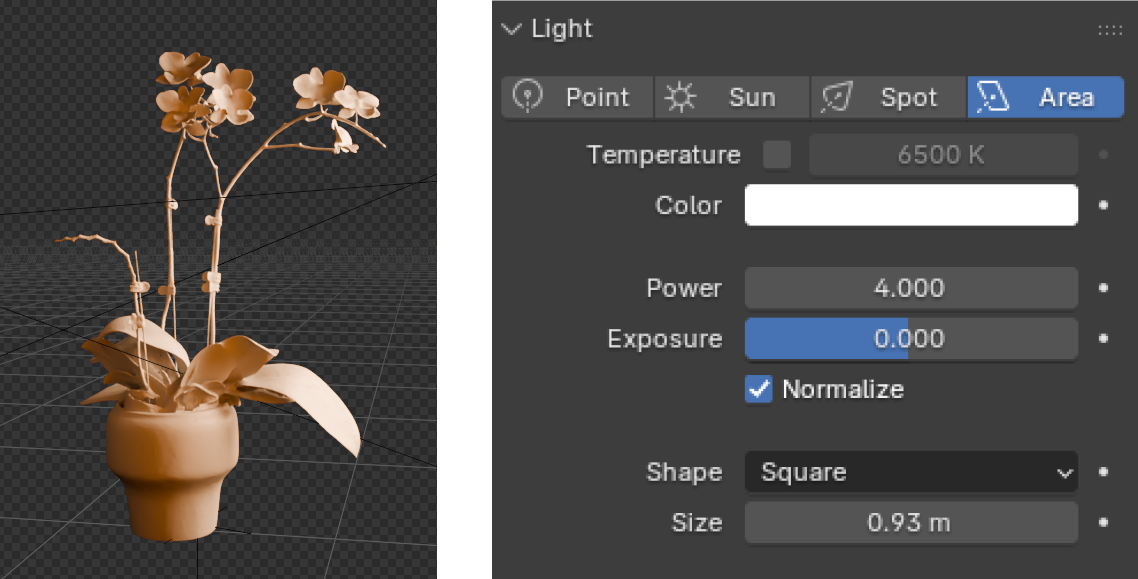
- We then want to set the world lights and object lights in our scene. I find it easiest to hide the 3DGS object, and work on lighting the Proxy Mesh since relighting is not reflected live. It may be helpful to give the Proxy Mesh a simple grey material. In this example I will try to match my background scene
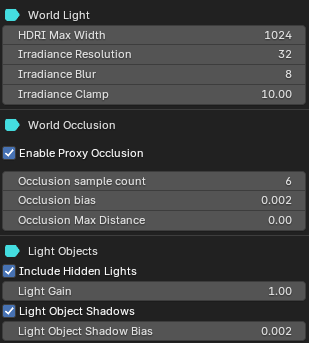
- Emmisive lights and complex World lighting setups are not considered.
- HDRI textures going into mix nodes, color adjustment nodes or raw Background nodes are supported. HDRI's should not be hidden in nodegroups.
- Once lights are set, we can check the settings on the 2. Bake Light menu. We can choose to include or disable contributions from the World and/or the scenes Light Objects
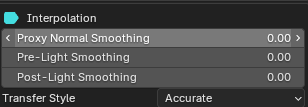
- Due to the sometimes sparse nature of 3DGS scans, or inaccurate Proxy Meshes, you can smooth the interpolated light transfer with the Interpolation settings:
- The quality of World Lighting occlusion (if enabled) and Light Object shadows can be contolled. Though these settings are somewhat arbitrary and subject to change from scene to scene - testing on lightweight scans is advised
- Once Bake settings are done, press Bake Light Data to begin the baking process. The progress will show in the viewport as an overlay.
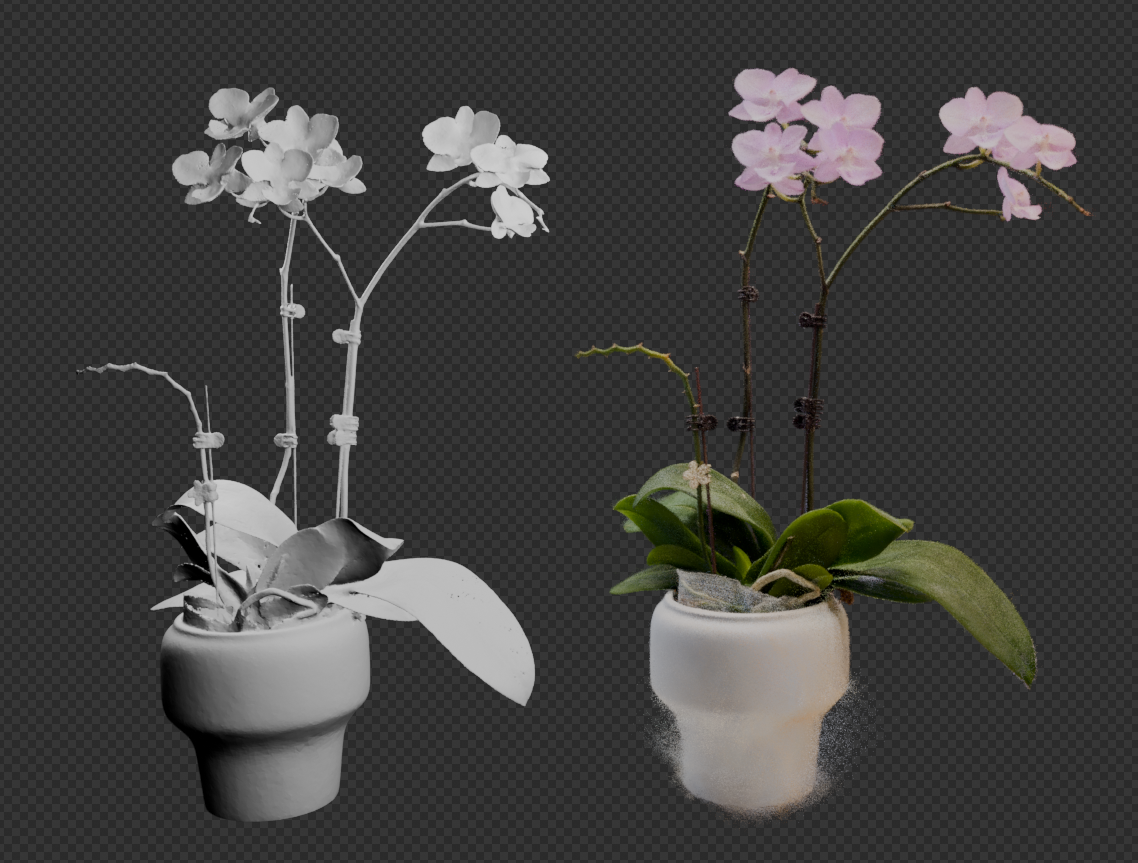
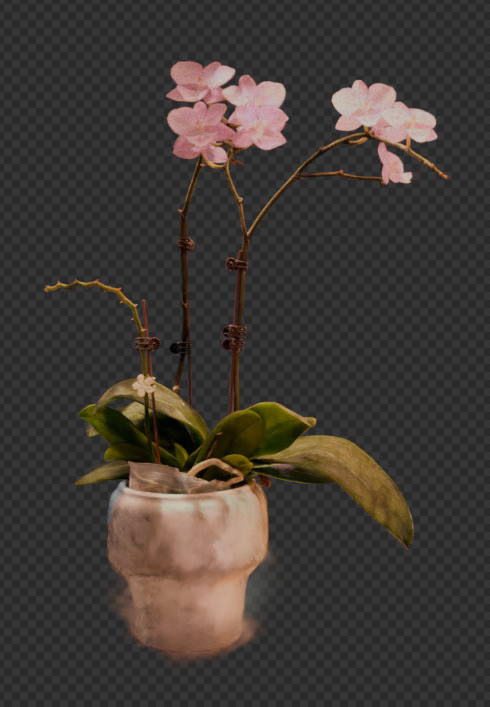
- Once light data is baked you can jump over to the 3. Apply Light menu. If you immediately press Apply Lighting, the baked light will be applied to the 3DGS model, but the results will need mixing.
- My world lighting was black, which is leaving the occluded areas very dark so I will first bring up the Ambient Base and reapply lighting:
- The shadows are too strong so I bring down shadow strength and reapply.
- I'll control the overlall light effect with Light Gain and Light Contrast:
- And try to bring down the highlights by changing the Max Light Factor:
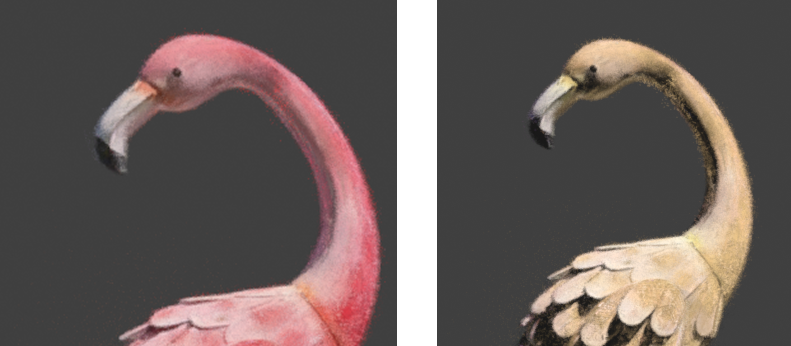
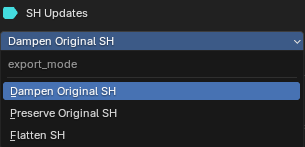
- The Light Bake edits don't affect Spherical Harmonics - so in the SH Updates section we can choose to Dampen SH, which will bring their effects closer to 0 according to the SH Strength. You can leave the SH values alone with Preserve SH, or you can set them all to 0 with Flatten SH.
- For more interesting results, you can use colored lights:
- If colored light data (or color from the world) is baked, you can adjust the color settings from the Apply Light menu, under Color Mix. If the Factor mode is set to Luminance, no color will be applied, only lightness values.
- Again, like luminance, you will have to play with settings to find something pleasing.
- There is no definite formula, and at the time of writing it is still a very experimental feature. So it is best to keep tweaking values and reapplying lighting until you are happy - but alsways be aware that you may not be able to achieve the results you want.


The Store Original Lighting button will store the currently displayed colors on the 3DGS object. If the object already has light data applied, the Store Original Lighting will overwrite any 'true' original data already stored.
Light Baking is much faster without using HDRIs / World lighting. You can try to compensate for this with the Ambient floor and other mix settings.
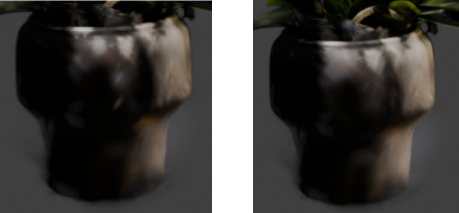
Smoothing settings off / Smoothing settings all set to 1, and Transfer style = Smooth
Avoid running any other resource heavy processes when baking. Don't be surprised if it takes a long time, and as stressed, avoid using large scans.
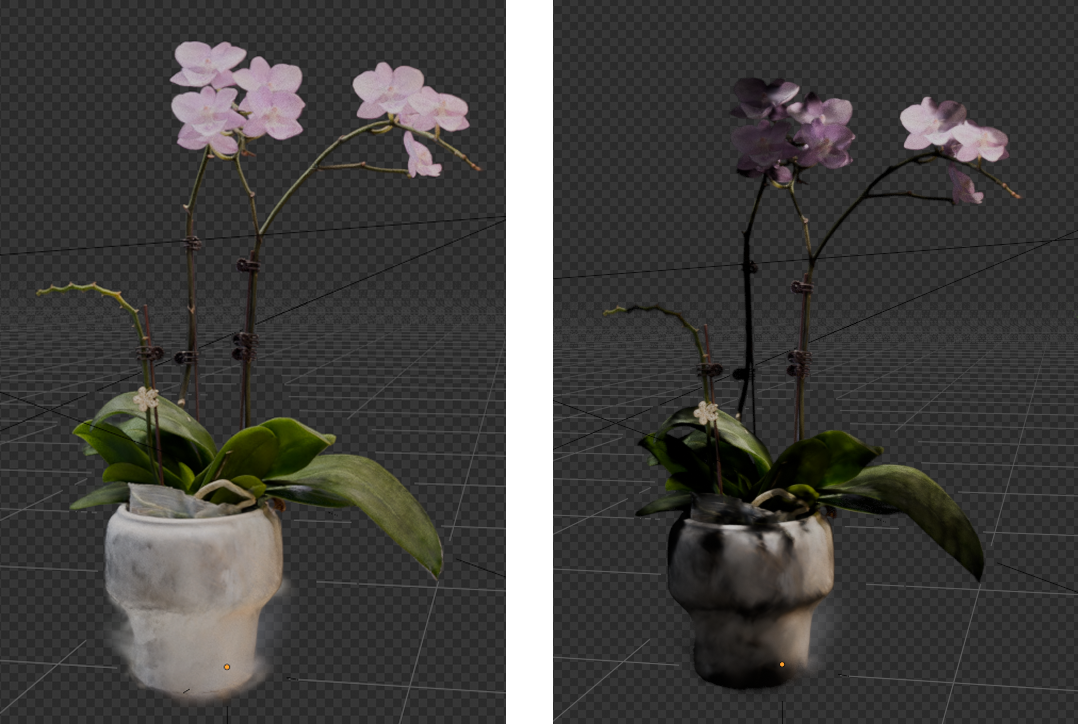
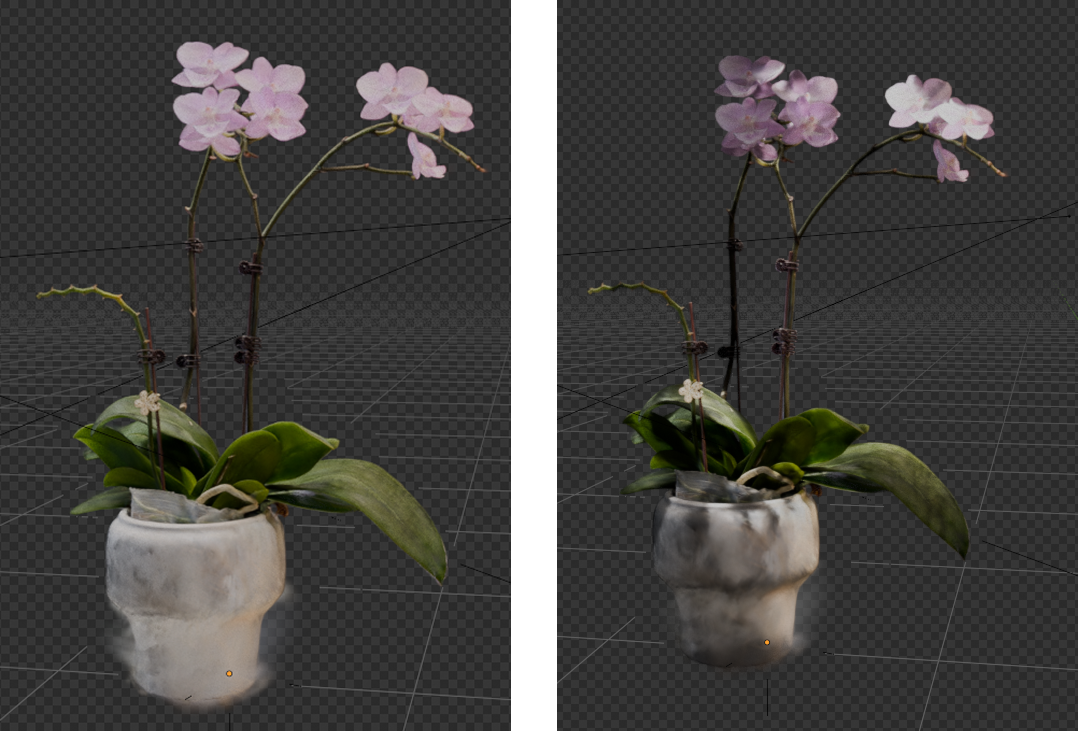
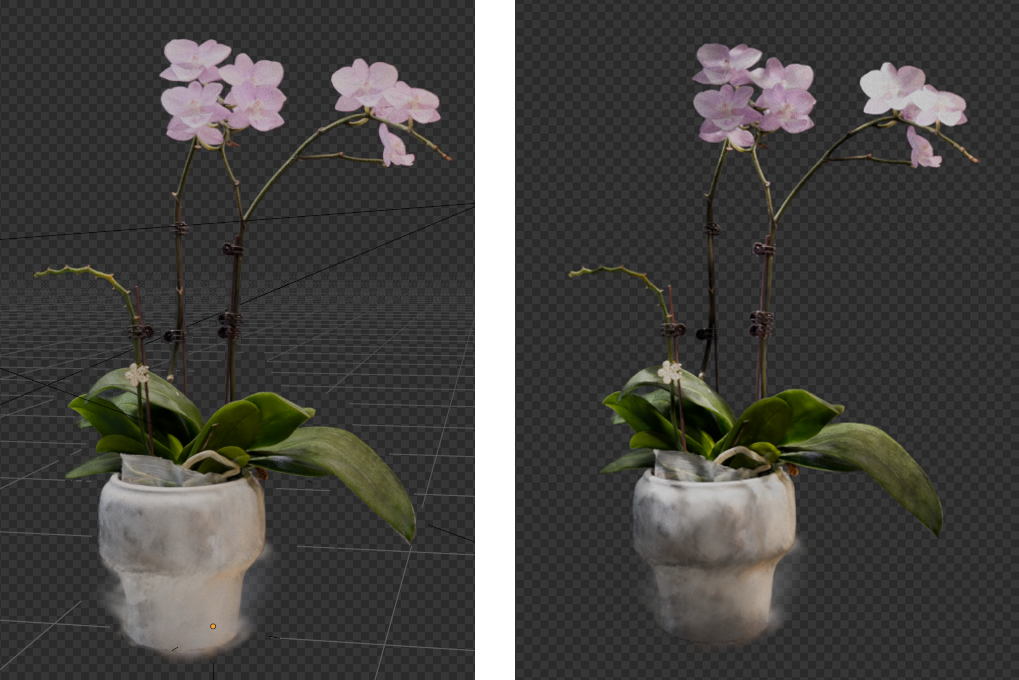
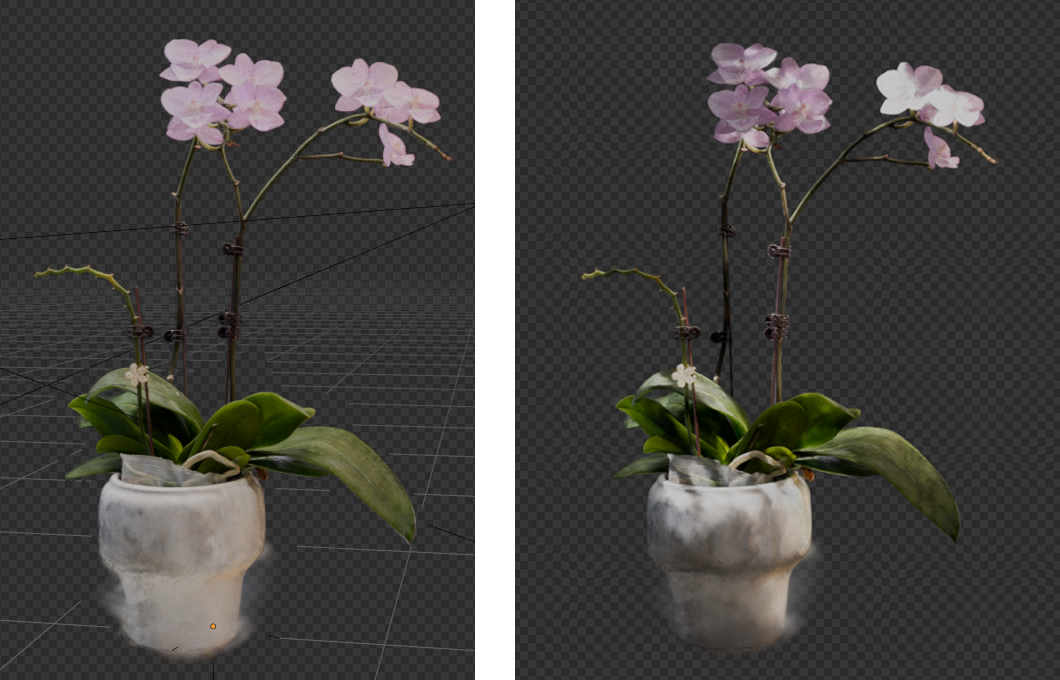


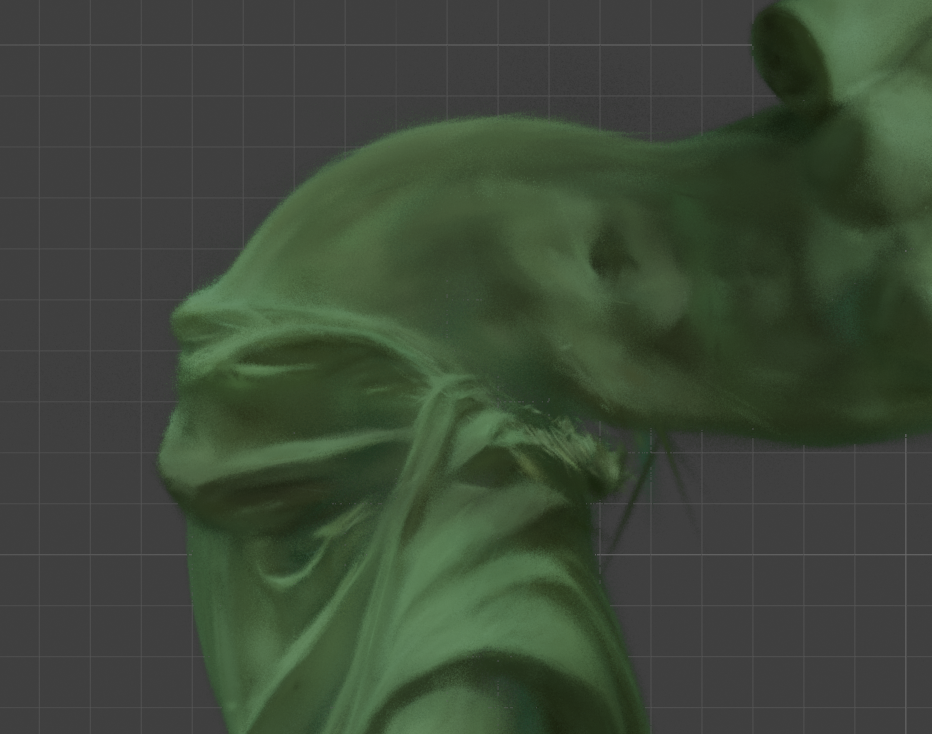
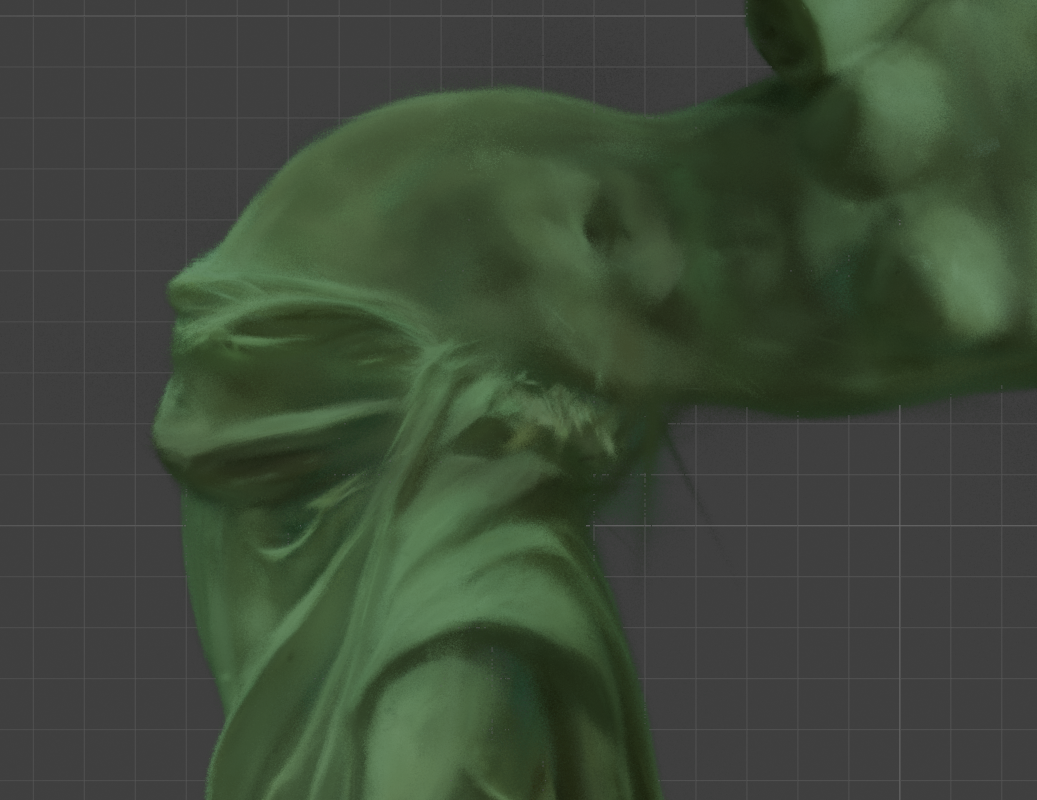
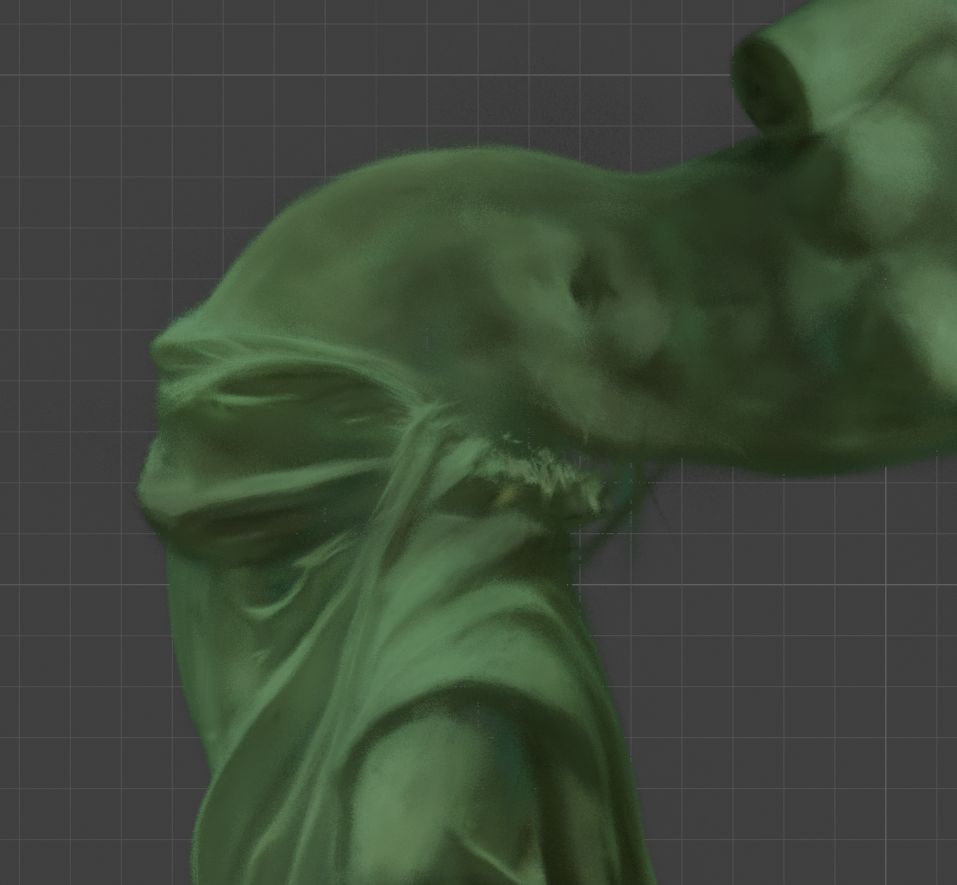
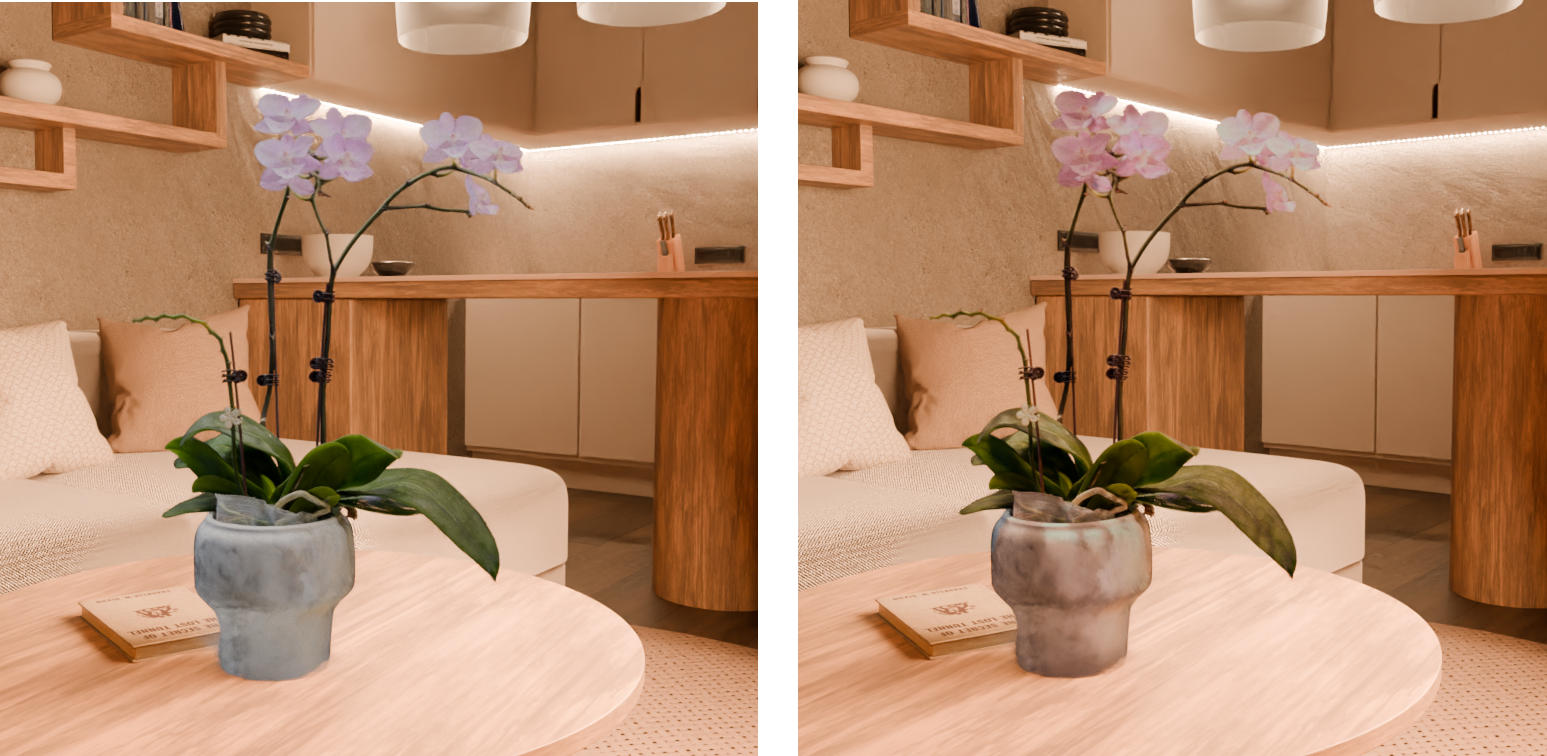
Before Light Bake:
After Light Bake:
16. Edit Mode - Export
- As stated in the addons tips. If you have rotated or a scaled 3DGS objects and applied those transforms using Blender native Apply Scale / Apply Rotation, the 3DGS attributes will not be updated correctly and the object can no longer be exported to other 3DGS apps correctly.
- The export function for both the 3DGS and Point Cloud menus will update 3DGS attributes correctly before exporting.
- Edits made directly to geometry, or by Geometry Nodes are exportable - edits made by shader nodes are not exportable.
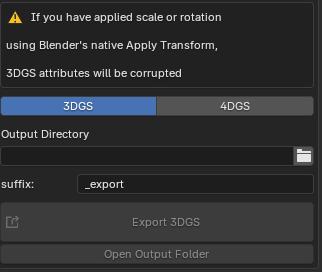
The current visible state of any 3DGS mesh object can be exported as a single .PLY file, or a .PLY sequence.
You can export a single .PLY from the 3DGS mode.

You must enter an output directory and a naming suffix for the output file.

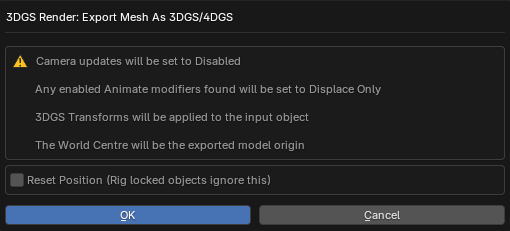
After pressing Export 3DGS a pop-up will show.

Reset Position will send your objects back to the world centre, since the World Centre will be the exported origin for a lot of software. Objects parented to a Proxy Rigging Object have their transforms locked and will not be moved to the world centre.
The output folder can be opened with Open Output Folder.
To export an animated .PLY sequence, select 4DGS mode. Again set an output directory and also choose the Rig Behaviour.

If the selected object has cached Rig data, this can be used to update and export the animated frames.
The export will be the length of the current timeline.
17. Edit Mode - Edit Select Too
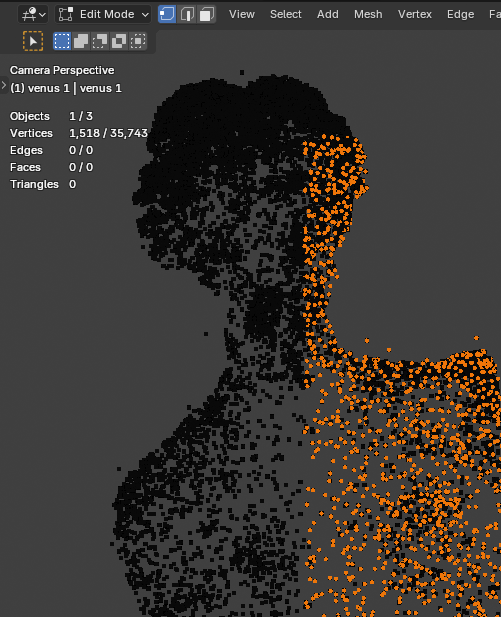
With a 3DGS object active, in the addon's Edit mode, and Blender's Edit mode, the addon UI will show a number of Select Tools.
These can be used for quick selection when editing a 3DGS object.
Select by Object will let you select all the points inside, or outside a specific object. For a quick transparent object, use the Add Wire/Cube/Sphere buttons.
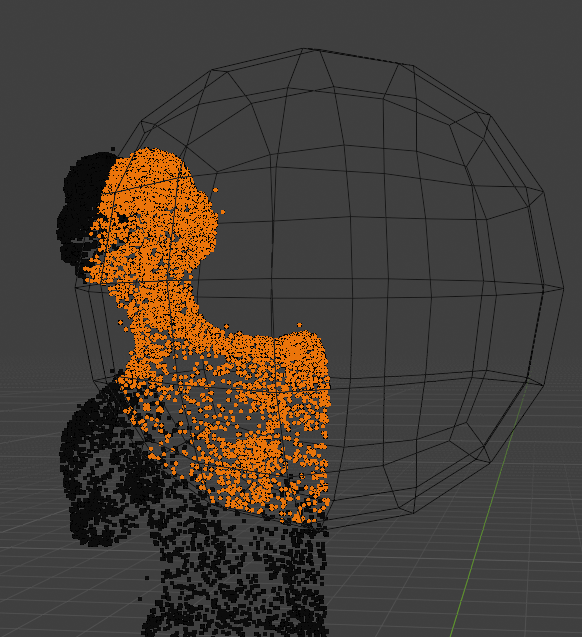
The select by attribute controls can be used to select using the 3DGS native attributes. Either the Scale or Rotation attributes, or Stretch which calculates how stretched a splat it based on it's scale attributes.
Once a mode is selected and Select is pressed, a pop up will allow the selection to be dialed in.
After pressing OK the settings will be shown in the bottom left of the UI for tweaking.
18. Edit Mode - Apply Transforms
As is normal during a regular Blender workflow, you may at some point want to Apply Transforms on your 3DGS object.
Since each individual point of a 3DGS object has its own special rotation, sclale and other attributes, relative to it's global rotation and scale - using Blender's Apply Scale, Rotation or both will corrupt a 3DGS object's native data.
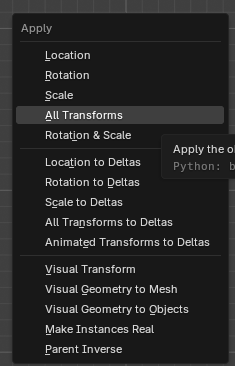
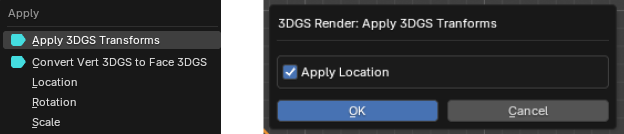
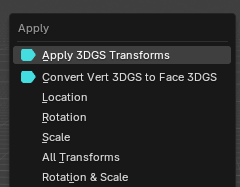
To apply transfomrs in a safe way that also updates the 3DGS data, use the Apply 3DGS Transforms button - found from the Ctrl+A menu in Blender's Object mode.
19. Edit Mode - Convert Mesh Type
Some operations (such as Vertex Painting) require a 3DGS object to be either vert basedm, or face based. With a 3DGS objected selected, in Blender's Object mode, pressing Ctrl+A will show a menu with the option Convert Vert 3DGS to Face 3DGS - or vice versa depending on the active object type.
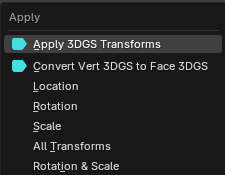
20. Render Mode
Render - Proxy Empty Objects - Create
After editing and placing 3DGS objects in the scene, we can preview them in real time using the Render mode.
For an object to appear in Render mode – the imported mesh PLY needs to have an associated Empty object. The Empty object can be scaled, moved and rotated to control the Gaussian Splats appearance.
By default, these Empty objects are created on importing a PLY if Create Proxy Object is checked.

If this was unchecked or somehow the Proxy Empty was deleted or corrupted a new one can be created from Render – Create. The mesh 3DGS object can be selected and pressing Create Proxy From Active will create a new Empty object.
Render - Scene Updates / Clean Up
The scene is automatically updated when entering Render mode – reflecting any geometry changes made in Edit mode.
The scene can also be updated with the Update Scene button.
Updates can occur a Single Time, or at Intervals. Using Intervals is generally not advised unless you have very small, lightweight scans.
If at any point you want to stop rendering in the scene you can use Stop Viewport Rendering on the Render – Clean Up menu. Empties can also be cleared by checking Delete All Proxy Empties.
Render - Rendering
The results seen in the viewport while in Render mode, can be rendered offline from the Render - Render sub menu.
By default, a single frame will be rendered, but animations can be rendered by checking Render Animation.
A Color Pass, Depth Pass or both can be rendered by ticking their check boxes.
An Active Camera must exist in the scene, and an Output directory must be specified for the Render button to become active. Once pressed, the scene will begin rendering offline. You can view progress of the render by opening your output directory folder.
If you want to combine the results of the 3DGS render with mesh objects in the scene, you can enable Combine With Native Render. Render progress will again be visible in the output folder, but to perform the necessary image compositing temp versions of the scene will first be rendered.
21. Mesh 2 3DGS
- Only Windows currently supports Mesh 2 3DGS, more OS may be added in the future.
- Your .OBJ mesh must be triangulated and have a corresponding colour image in .JPG or .PNG formats as well as an accurate .MTL file. All files must be in the same folder and the names inside the .MTL file must be correct.
From the Mesh 2 3DGS menu we can see the above warnings, a toggle for Validate Mesh, Texture and .MTL, and a button for Select .OBJ.
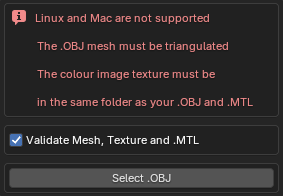
The Validate Mesh, Texture and .MTL toggle will attempt to check that your mesh and associated files meet the requirements to perform the conversion.
It is recommended top leave this checked, but if you think the addon is falsely flagging a correct mesh and file structure, you can disable it to skip this check.
Pressing Select .OBJ will open an import window. From here, select your .OBJ file.
It can be useful the first time you use this function to open the System Console from Window….Toggle System Console, to check that the process is running.
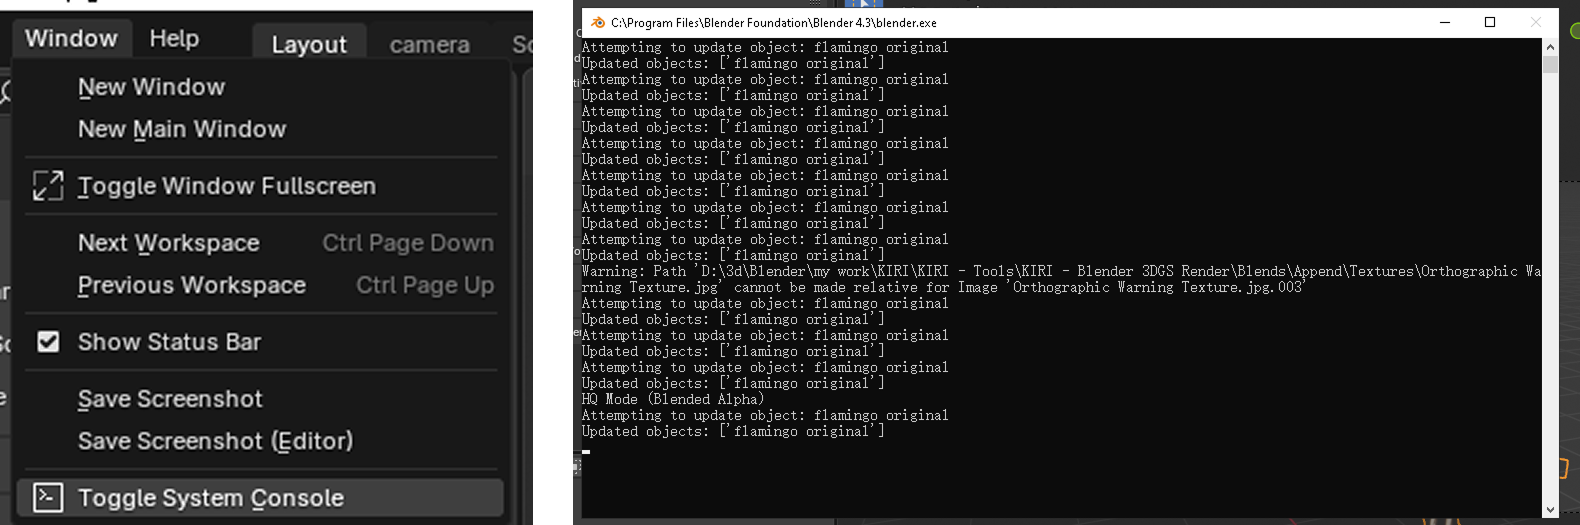
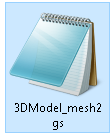
Once the process is complete, the output folder will open and a new .PLY file be present. It will be named with the base mesh name, plus _mesh2gs suffix
22. Extra Resources
The buttons at the bottom of the addon can launch web browsers with the add-on’s written and video documentation, KIRI addon page or Super Hive Market page.